Monday 28 December 2009

Upgrade to GWT 2

To upgrade the Eclipse Plugin to GWT 2, is an easy process. Unfortunately GWT is installed with the default name, GWT, GWT (1), GWT (2) and so on, for any different release. Ideally, the name used is a meaning full one, such as GWT 1.7.1 and GWT 2.0.0.

In this short article we discuss who to rename an existing GWT Eclipse Plugin and install GWT 2

Rename the existing GWT Eclipse Plugin

This step is optional.

By default, the GWT Eclipse plugin is installed with the name GWT as shown in the following figure. This can be misleading especially if you have multiple versions installed. Unfortunately, the name cannot be changed once installed. The only way to rename it is to remove it and then add it again with the proper name.

To rename the GWT Eclipse Plugin, please follow the steps below:

  1. From the menu, open Window > Preferences
  2. Expand the Google node and select the Web Toolkit

    As you can notice, the name set to GWT.
  3. Select it and click the Remove button
  4. Once removed, click the Add button
  5. A dialog will open. Click the Browse button to locate the current GWT Eclipse plugin

  6. Browse to the GWT Eclipse plugin folder. This is usually found at: C:\Program Files\Eclipse\eclipse-jee-galileo-SR1-win32\plugins\com.google.gwt.eclipse.sdkbundle.win32_1.7.1.v200909221731\gwt-windows-1.7.1.

    Note that the version numbers may be different depending on the version you have installed.

  7. Set the display name to correspond to the version, GWT X.X.X, and press OK

  8. Press OK to complete the process

This complete the renaming process.

Install the GWT 2 Eclipse plugin

This is installed as any other new Eclipse plugin.

  1. From the menu, open Help > Install New Software.... Make sure to select the Install New Software... and NOT Check for Updates
  2. Select the Google Eclipse URL: http://dl.google.com/eclipse/plugin/3.5 (for Eclipse 3.5), check both the Plugin and SDK options and press Next as shown in the image below.

  3. Next, Next, ..., Next through the installation. Once ready, restart Eclipse.

The GWT 2 Eclipse plugin is installed, with the name GWT. It is recommended to rename it to GWT 2.0.0 following the steps above discussed.

Draft Compile

One of the new features available in GWT2 is the draft compile, which is ideal for development as it skips the optimisation processes carried out by the compiler reducing the compile time. This is a great feature for development, but the production code SHOULD NOT be compiled in this mode.

To make use of this feature, simple add the -draftCompile to the advance compiler options as illustrated below.

Thursday 17 December 2009

Simple Java WAV Player

In this article we'll discuss a simple way how to play wav files in Java. We'll start with the complete example and explain each bit in the process. This example only involves one class, the one listed below.

package com.albertattard.pmm;

import java.io.FileInputStream;
import java.io.FileNotFoundException;
import java.io.IOException;
import java.io.InputStream;
import javax.sound.sampled.AudioFormat;
import javax.sound.sampled.AudioInputStream;
import javax.sound.sampled.AudioSystem;
import javax.sound.sampled.DataLine;
import javax.sound.sampled.LineUnavailableException;
import javax.sound.sampled.SourceDataLine;
import javax.sound.sampled.UnsupportedAudioFileException;

public class TheMusicPlayer {

  public static void play(final InputStream inputStream) {
    new Thread() {
      @Override
      public void run() {
        AudioInputStream audioInputStream = null;
        try {
          audioInputStream = AudioSystem
              .getAudioInputStream(inputStream);
        } catch (UnsupportedAudioFileException e) {
          e.printStackTrace();
          return;
        } catch (IOException e) {
          e.printStackTrace();
          return;
        }

        SourceDataLine sourceDataLine = null;
        try {
          AudioFormat audioFormat 
              = audioInputStream.getFormat();
          DataLine.Info info = new DataLine.Info(
              SourceDataLine.class, audioFormat);
          sourceDataLine = 
              (SourceDataLine) AudioSystem.getLine(info);
          sourceDataLine.open(audioFormat);
        } catch (LineUnavailableException e) {
          e.printStackTrace();
          return;
        }

        sourceDataLine.start();
        byte[] data = new byte[524288];// 128Kb
        try {
          int bytesRead = 0;
          while (bytesRead != -1) {
            bytesRead = 
                audioInputStream.read(data, 0, data.length);
            if (bytesRead >= 0)
              sourceDataLine.write(data, 0, bytesRead);
          }
        } catch (IOException e) {
          e.printStackTrace();
          return;
        } finally {
          sourceDataLine.drain();
          sourceDataLine.close();
        }
      }
    }.start();
  }

  public static void play(final String wavFile)
      throws FileNotFoundException {
    play(new FileInputStream(wavFile));
  }
}

Those of you who are in a hurry, just copy and paste the above code and get on with your life. The others who can spare sometime, just read the following part.

Explained

The class has two static overloaded methods which play the wav file provides as a parameter. The second method simple invokes the first method passing an instance of input stream (and instance of FileInputStream, which inherits from InputStream)

All the logic is found in the first play() method, and that's what we'll be explaining next.

Let say we have a program and would like to play a sound (saved as a wav file) when an event/scenario occurs. The code to do so is very straight forward as illustrated below (a copy and paste from the example above).

        AudioInputStream audioInputStream = null;
        try {
          audioInputStream = AudioSystem
              .getAudioInputStream(The Input Stream);
        } catch (UnsupportedAudioFileException e) {
          e.printStackTrace();
          return;
        } catch (IOException e) {
          e.printStackTrace();
          return;
        }

        SourceDataLine sourceDataLine = null;
        try {
          AudioFormat audioFormat 
              = audioInputStream.getFormat();
          DataLine.Info info = new DataLine.Info(
              SourceDataLine.class, audioFormat);
          sourceDataLine = 
              (SourceDataLine) AudioSystem.getLine(info);
          sourceDataLine.open(audioFormat);
        } catch (LineUnavailableException e) {
          e.printStackTrace();
          return;
        }

        sourceDataLine.start();
        byte[] data = new byte[524288];// 128Kb
        try {
          int bytesRead = 0;
          while (bytesRead != -1) {
            bytesRead = 
                audioInputStream.read(data, 0, data.length);
            if (bytesRead >= 0)
              sourceDataLine.write(data, 0, bytesRead);
          }
        } catch (IOException e) {
          e.printStackTrace();
          return;
        } finally {
          sourceDataLine.drain();
          sourceDataLine.close();
        }

The above code fragment is made from three parts:

  • Initialisation of the audio input stream
  • Initialisation of the audio output
  • Playing the audio data

We're reading bytes from the input stream (the famous wav) and instead of writing/printing these in the console (as we traditionally do with text files), we're writing to the speaker/sound card of the computer.

We start by initialising the It's good to point out that the AudioInputStream, which inherits from the InputStream. This instance behaves the same like any other stream and can be treated/handled in the same manner as other streams.

AudioInputStream audioInputStream = null;
try {
  audioInputStream = AudioSystem
    .getAudioInputStream(The Input Stream);
} catch (UnsupportedAudioFileException e) {
  e.printStackTrace();
  return;
} catch (IOException e) {
  e.printStackTrace();
  return;
}

Then we initialise the audio output (this is NOT an OutputStream), that is, where the sound will be played. This has to match the audio input initialise in the previous step. Remember that there are many different sound files and not all these can be played with the following code.

SourceDataLine sourceDataLine = null;
try {
  AudioFormat audioFormat 
    = audioInputStream.getFormat();
  DataLine.Info info = new DataLine.Info(
    SourceDataLine.class, audioFormat);
  sourceDataLine = 
    (SourceDataLine) AudioSystem.getLine(info);
  sourceDataLine.open(audioFormat);
} catch (LineUnavailableException e) {
  e.printStackTrace();
  return;
}

The first two were quite straight forward. In the third step we're actually playing the sound by reading the bytes and play them in a similar fashion we do with other streams. We're reading a predefined amount of data (128k) into the array called data and saving the amount of bytes read in the other variable bytesRead.

bytesRead = audioInputStream.read(data, 0, data.length);

When the whole file is played, and there is no more data to be played, the read() method returns -1 (like it does with any other InputStream). This will have the while condition to false ending the playing process.

It is good to note that the third step will consume the focus of program until the wav file is played. That is, if you have a two minute wav file, than the above code will take two minutes to execute. All the other parts of the program (that are executed by this thread) will have to wait for the sound/music to finish. Since this is not what we want, the static method play() wraps this code into a thread which is started at the end of the method.

public static void play(final InputStream inputStream) {
  new Thread() {
    @Override
    public void run() {
      Code removed for brevity
    }
  }.start();
}

Since the code is started within a thread the control is immediately returned to the calling method which can proceed without having to wait for the file to play.

To play a wav file, all we need to do is invoke the pay method with the wav file as a parameter as illustrated below.

package com.albertattard.pmm;

public class TheMain {

  public static void main(String[] args) {
    // File downloaded from: 
    //   http://freewavesamples.com/bowed-bass-c2
    TheMusicPlayer.play(TheMain.class
        .getResourceAsStream("Bowed-Bass-C2.wav"));
  }
}

It's good to point out that the wav file Bowed-Bass-C2.wav (available at: http://freewavesamples.com/bowed-bass-c2) is in the same directory/package as the above class.

Wednesday 16 December 2009

Playing with the Mouse

In this article I'll be discussing how we can you can enhance an graphical component by handling mouse events such as mouse clicks and movements.

This article will not discuss the graphical aspect and assumes that you know how to create a simple UI component extending the JComponent and adding this component into a JFrame. For more information about how to do this, please read the article: Practical Example of Simple Java UI Component.

A note of caution to the reader: This is not an exhaustive article about events and some topics are simple mentioned while others not discussed at all. While you're encouraged to learn as much as you can, it's best to first read this topic as provided here in the order provided and then expand your knowledge once you have read it.

Create an Environment

Let's start by create a simple components (that does nothing) which will add into a frame.

package com.albertattard.pwtm;

import java.awt.Graphics;
import javax.swing.JComponent;

@SuppressWarnings("serial")
public class MyComponent extends JComponent {
  @Override
  protected void paintComponent(Graphics g) {
    super.paintComponent(g);
  }
}

Always start with a super simple class and then slowly evolve it testing each change on the way. Don't wait for bulk changes to test as then it may be too late to understand what's wrong.

Now it's time to create the frame and add the above component to it.

package com.albertattard.pwtm;

import java.awt.Color;
import javax.swing.BorderFactory;
import javax.swing.JFrame;

@SuppressWarnings("serial")
public class MyFrame extends JFrame {

  private MyComponent myComp;

  public MyFrame() {
    initComponents();
  }

  private void initComponents() {
    setLayout(null);

    myComp = new MyComponent();
    myComp.setBorder(
      BorderFactory.createLineBorder(Color.RED));
    myComp.setBounds(10, 10, 400, 200);
    add(myComp);
  }
}

Now let's kick off this example by creating another with the main method and have this show rolling

package com.albertattard.pwtm;

import javax.swing.JFrame;
import javax.swing.SwingUtilities;

public class MyMain {
  public static void main(String[] args) {
    SwingUtilities.invokeLater(new Runnable() {
      public void run() {
        createShowFrame();
      }
    });
  }

  private static void createShowFrame() {
    JFrame frame = new MyFrame();
    frame.setTitle("Playing with the Mouse");
    frame.setSize(600, 400);
    frame.setDefaultCloseOperation(
      JFrame.EXIT_ON_CLOSE);
    frame.setLocationRelativeTo(null);
    frame.setVisible(true);
  }
}

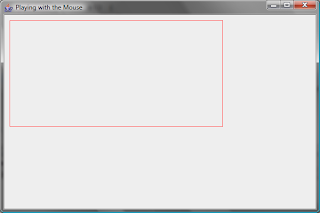
Now that we have all the require components in place let's run. The above three classes should produce the following (or something very similar).


Let's start playing

Java provides three methods/mechanisms that allow us, the developers, to use to handle mouse events. Let say that we want to change the background colour of my component whenever the mouse hovers over it and rest the colour when the mouse moves away from the component.

We want that our component (the class called MyComponent defined above) to do something when the mouse is moved over it. Then, we have to register a mouse listener within this component and act accordingly. The JComponent class (which MyComponent inherits from) has all the logic we need, that is, methods that allow us to register mouse listeners. Whenever mouse events are occur, these methods will advise/notify our listeners with the changes and we can act accordingly. We first start by registering a mouse listener and then implement the methods we're interested in as illustrated below.

package com.albertattard.pwtm;

import java.awt.Color;
import java.awt.Graphics;
import java.awt.event.MouseAdapter;
import java.awt.event.MouseEvent;

import javax.swing.JComponent;

@SuppressWarnings("serial")
public class MyComponent extends JComponent {

  public MyComponent() {
    initListeners();
  }

  private void initListeners() {
    addMouseListener(new MouseAdapter() {
      public void mouseExited(MouseEvent e) {
        setBackground(Color.WHITE);
        repaint();
      }

      public void mouseEntered(MouseEvent e) {
        setBackground(Color.RED);
        repaint();
      }
    });
  }

  @Override
  protected void paintComponent(Graphics g) {
    super.paintComponent(g);

    g.setColor(getBackground());
    g.fillRect(0, 0, getWidth(), getHeight());
  }
}

Hold your horses, I'm lost.

There's lot of new code in this class, so let's start understanding this bit by bit. Let's start with the initListeners() method. This method is registering a mouse listener by calling the addMouseListener () method inherited from the JComponent class and pass our listener. For simplicity, some code was removed.

  private void initListeners() {
    addMouseListener(/* The Mouse Listener*/);
  }

After removing all the other code, this method becomes very simple and understandable. If you refer to the previous example, we also included a constructor which is calling this method, which I don't believe it requires explanation. The paintComponent () method was also enhanced which now fills a rectangle with the set colour. This rectangle has the same size of our component which makes it appear as the background colour.

Let's now turn our attention to the MouseListener. What is it? Whenever a mouse event is fired, (in laymen terms) the JVM advise our listener about the change. It does so by execute one of the five methods defined by the MouseListener listed below:

  • mouseClicked()
  • mouseEntered()
  • mouseExited()
  • mousePressed()
  • mouseReleased()

The method names are self explanatory but the process may not be. We first create an instance of the MouseListener, which is an interface, and override these methods. Then we register our listener with the component. When the mouse is clicked on our component, the method mouseClicked() will be executed. When the mouse hovers on our component, the method mouseEntered() is executed and when the mouse moves away from our component, the mouseExited().

One last thing before we return to our example. How many from the mouse listener's methods do we need to use to fulfil our requirement? Only two, as the requirement is to change the background when the mouse hovers in and out of our component. Java provides what are referred to adaptors. WTF? Java provides a skeleton class that implement this interfaces and provide default methods (methods that do nothing) for all the interface methods. We can then extend this class and override the method we want. Since the adaptor overrides all the interface methods, we only have to override those we're interested in, which simplifies our work.

Back to our initListeners() method. We're creating an instance of MouseAdapter, and registering it with our component.

  private void initListeners() {
    addMouseListener(new MouseAdapter() {
      public void mouseExited(MouseEvent e) {
        setBackground(Color.WHITE);
        repaint();
      }

      public void mouseEntered(MouseEvent e) {
        setBackground(Color.RED);
        repaint();
      }
    });
  }

As you can see from the above code fragment, we're only overriding two methods, the mouseEntered() and mouseExited() methods. In these methods we're changing the background colour and calling the repaint method.

Straight forward he

Getting it to the next level

That was fun, but let's improve it. Let's draw (fill) a circle following the mouse motion.

Before we can do so, we have to discuss another thing, the MouseEvent.

Before the event is fired and our listeners' methods invoked, information about the event is gathered (by something else which you don't need to care about, at least for now) and forwarded to you (the developer) as an event object, the MouseEvent in this case. This object contains information pertaining to our event, such as the mouse position, the time of the event and other things which may be useful when processing such event. We can (need to) use such information to achieve our goal as shown below.

package com.albertattard.pwtm;

import java.awt.Color;
import java.awt.Graphics;
import java.awt.Point;
import java.awt.event.MouseAdapter;
import java.awt.event.MouseEvent;
import java.awt.event.MouseMotionAdapter;
import javax.swing.JComponent;

@SuppressWarnings("serial")
public class MyComponent extends JComponent {

  private Point mousePoint; 

  public MyComponent() {
    setForeground(Color.BLUE); 
    initListeners();
  }

  private void initListeners() {
    addMouseListener(new MouseAdapter() {
      public void mouseExited(MouseEvent e) {
        setBackground(Color.WHITE);
        repaint();
      }

      public void mouseEntered(MouseEvent e) {
        setBackground(Color.RED);
        repaint();
      }
    });

    addMouseMotionListener(new MouseMotionAdapter() {
      @Override
      public void mouseMoved(MouseEvent e) {
        mousePoint = e.getPoint();
        repaint();
      }
    });
  }

  @Override
  protected void paintComponent(Graphics g) {
    super.paintComponent(g);

    g.setColor(getBackground());
    g.fillRect(0, 0, getWidth(), getHeight());

    if (mousePoint != null) {
      int ballSize = 15;
      g.setColor(getForeground());
      g.fillOval(mousePoint.x - ballSize / 2, 
                 mousePoint.y - ballSize / 2,
                 ballSize, ballSize);
    }
  }
}

The changes from the previous class are highlighted and discussed below.

An instance field was added to our component. Why? We need to transfer the mouse position, magically provided to us by the mouse events (discussed later on), to the paint method. Since we cannot call the paint method directly from the event (the reapint() call is something else), we need to save this information in the instance field, mousePoint, and the use it from the paint method. This instance field is accessible by both methods. First this field is updated by the method

      public void mouseMoved(MouseEvent e) {
        mousePoint = e.getPoint();
        repaint();
      }

within our new adaptor, . The method mouseMoved() is invoked every time the mouse is moved within our component. This is important to understand. Only the mouse events that are related with our component are captured by our listeners. So when the mouse moves out of our component, this method will stop being invoked.

Next we'll discuss the mouse clicks

Handling the clicks

Let say that we also want to handle the mouse click that happen on our component. For simplicity we'll display a simple text in the top left corner listing the number of click that occure as shown below.

A long story short, add a new instance field (called clickCount) of type int and paint its value in the paint method as highlighted below. Also, override the appropriate method in the mouse adaptor.

package com.albertattard.pwtm;

import java.awt.Color;
import java.awt.Graphics;
import java.awt.Point;
import java.awt.event.MouseAdapter;
import java.awt.event.MouseEvent;
import java.awt.event.MouseMotionAdapter;

import javax.swing.JComponent;

@SuppressWarnings("serial")
public class MyComponent extends JComponent {

  private Point mousePoint;
  private int clickCount; 

  public MyComponent() {
    setForeground(Color.BLUE);
    initListeners();
  }

  private void initListeners() {
    addMouseListener(new MouseAdapter() {
      public void mouseExited(MouseEvent e) {
        setBackground(Color.WHITE);
        repaint();
      }

      public void mouseEntered(MouseEvent e) {
        setBackground(Color.RED);
        repaint();
      }

      @Override
      public void mouseClicked(MouseEvent e) {
        clickCount++;
        repaint();
      }
    });

    addMouseMotionListener(new MouseMotionAdapter() {
      @Override
      public void mouseMoved(MouseEvent e) {
        mousePoint = e.getPoint();
        repaint();
      }
    });
  }

  @Override
  protected void paintComponent(Graphics g) {
    super.paintComponent(g);

    g.setColor(getBackground());
    g.fillRect(0, 0, getWidth(), getHeight());

    if (mousePoint != null) {
      int ballSize = 15;
      g.setColor(getForeground());
      g.fillOval(mousePoint.x - ballSize / 2,
          mousePoint.y - ballSize / 2, ballSize, ballSize);
    }

    if (clickCount > 0) {
      g.setColor(getForeground());
      g.drawString("Click Count: " + clickCount, 10, 20);
    } else {
      g.setColor(getForeground());
      g.drawString("No Clicks!!!", 10, 20);
    }
  }
}

The above code is not rocket science but it has a little flaw. If you drag the mouse inside the component, the blue circle will not follow the mouse pointer as illustrated below.

Why not? The MouseMotionListener, which the MouseMotionAdapter implements has two methods but we're only overriding one as illustrated below.

    addMouseMotionListener(new MouseMotionAdapter() {
      @Override
      public void mouseMoved(MouseEvent e) {
        mousePoint = e.getPoint();
        repaint();
      }
    });

The other method, mouseDragged(), is used to handle mouse dragging events as illustrated code fragment below.

     addMouseMotionListener(new MouseMotionAdapter() {
      @Override
      public void mouseDragged(MouseEvent e) {
        mousePoint = e.getPoint();
        repaint();
      }
      
      @Override
      public void mouseMoved(MouseEvent e) {
        mousePoint = e.getPoint();
        repaint();
      }
    }); 

Dragging is more complex than one may think and is discussed further in the following section

Dragging the mouse

For this example, we'll create a new component and will make use of it rather than keep changing the other one. Like before, we'll start with a simple example and keep building on it. We'll start with the following simple component.

package com.albertattard.pwtm;

import java.awt.Color;
import java.awt.Graphics;
import java.awt.Graphics2D;
import java.awt.Rectangle;
import javax.swing.JComponent;

@SuppressWarnings("serial")
public class MyDragComponent extends JComponent {

  private Rectangle draggableShape;

  public MyDragComponent() {
    draggableShape = new Rectangle(20, 20, 50, 50);
    setForeground(Color.BLUE);
  }

  @Override
  protected void paintComponent(Graphics g) {
    super.paintComponent(g);

    Graphics2D g2d = (Graphics2D) g;

    g2d.setColor(getBackground());
    g2d.fillRect(0, 0, getWidth(), getHeight());

    g2d.setColor(getForeground());
    g2d.fill(draggableShape);
  }
}

This component simply draws a solid blue 50 by 50 rectangle at the x and y coordinates 20 as illustrated below

Remember to add this component to the frame before you test it out

Let's start be arm our rectangle with a red border when the mouse enters the box as shown below. Note that the component has a red border and the mouse events are triggered for any mouse activity within the component. We need to filter out movements outside the rectangle and only arm the rectangle when the mouse is on it.

How can we do that? Quiet simple. Like before, we create a field (called mouseInside) and will set it to true when the mouse is within the rectangle and false otherwise. The updates are highlighted below.

package com.albertattard.pwtm;

import java.awt.BasicStroke;
import java.awt.Color;
import java.awt.Graphics;
import java.awt.Graphics2D;
import java.awt.Rectangle;
import java.awt.event.MouseEvent;
import java.awt.event.MouseMotionAdapter;

import javax.swing.JComponent;

@SuppressWarnings("serial")
public class MyDragComponent extends JComponent {

  private Rectangle draggableShape;
  private boolean mouseInside; 

  public MyDragComponent() {
    draggableShape = new Rectangle(20, 20, 50, 50);
    setForeground(Color.BLUE);
    initListeners();
  }

  private void initListeners() {
    addMouseMotionListener(new MouseMotionAdapter() {
      @Override
      public void mouseMoved(MouseEvent e) {
        mouseInside = draggableShape.contains(e.getPoint());
        repaint();
      }
    });
  }

  @Override
  protected void paintComponent(Graphics g) {
    super.paintComponent(g);

    Graphics2D g2d = (Graphics2D) g;

    g2d.setColor(getBackground());
    g2d.fillRect(0, 0, getWidth(), getHeight());

    g2d.setColor(getForeground());
    g2d.fill(draggableShape);

    if (mouseInside) {
      g2d.setColor(Color.RED);
      g2d.setStroke(new BasicStroke(3));
      g2d.draw(draggableShape);
      g2d.setStroke(new BasicStroke(1));
    }
  }
}
Why are we resetting the stroke at the end of the paint component method? Ideally you rest all changes made to the graphics component once done as other paint methods for this object such paint border method will inherit your changes. In this case, if you do not reset the stroke the border will be painted with this stroke.

The following code fragment does the trick. The method mouseMoved () is continually called by the underlying system (so to say) every time the mouse is moved over our component. When the mouse point (retrieved from the mouse event provided as the method parameter) is within the rectangle area, the mouseInside field is set to true.

      public void mouseMoved(MouseEvent e) {
        mouseInside = draggableShape.contains(e.getPoint());
        repaint();
      }

Let's not stop here. Let's make the rectangle draggable. By draggable I mean that the user can drag the rectangle around our component as shown below.

This is not an easy task and some may find it hard to understand but let's not panic. The following code does the job.

package com.albertattard.pwtm;

import java.awt.BasicStroke;
import java.awt.Color;
import java.awt.Graphics;
import java.awt.Graphics2D;
import java.awt.Point;
import java.awt.Rectangle;
import java.awt.event.MouseEvent;
import java.awt.event.MouseMotionAdapter;
import javax.swing.JComponent;

@SuppressWarnings("serial")
public class MyDragComponent extends JComponent {

  private Rectangle draggableShape;
  private boolean mouseInside;
  private Point lastMousePoint; 

  public MyDragComponent() {
    draggableShape = new Rectangle(20, 20, 50, 50);
    setForeground(Color.BLUE);
    initListeners();
  }

  private void initListeners() {
    addMouseMotionListener(new MouseMotionAdapter() {
      @Override
      public void mouseMoved(MouseEvent e) {
        mouseInside = draggableShape.contains(e.getPoint());
        lastMousePoint = e.getPoint();
        repaint();
      }

      @Override
      public void mouseDragged(MouseEvent e) {
        mouseInside = draggableShape.contains(e.getPoint());
        if (mouseInside) {
          if (lastMousePoint != null) {
            draggableShape.x += 
                e.getPoint().x - lastMousePoint.x;
            draggableShape.y += 
                e.getPoint().y - lastMousePoint.y;
          }
        }
        lastMousePoint = e.getPoint();
        repaint();
      }
    });
  }

  @Override
  protected void paintComponent(Graphics g) {
    super.paintComponent(g);

    Graphics2D g2d = (Graphics2D) g;

    g2d.setColor(getBackground());
    g2d.fillRect(0, 0, getWidth(), getHeight());

    g2d.setColor(getForeground());
    g2d.fill(draggableShape);

    if (mouseInside) {
      g2d.setColor(Color.RED);
      g2d.setStroke(new BasicStroke(3));
      g2d.draw(draggableShape);
      g2d.setStroke(new BasicStroke(1));
    }
  }
}

Let's starts discussing the code.

When the mouse is dragged within the rectangle, we're also moving it. The rectangle can be dragged from anywhere within. So we have to take under consideration where the mouse was clicked within the rectangle and shift the rectangle by the offset, that is, by the amount the mouse was moved. We cannot simply set the rectangle's x and y coordinates to match those of the event. The following sketch highlights this (hopefully).

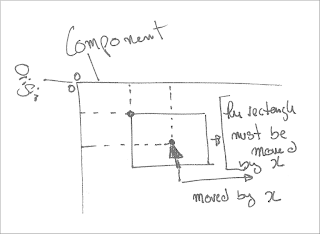
To do this we added a new field called lastMousePoint, which is used to save the last mouse position (as the name infers). Instead of setting the rectangle coordinates equal to the mouse coordinates we adjust them by how much the mouse was moved using the following (copy and paste from above) logic.

      @Override
      public void mouseDragged(MouseEvent e) {
        mouseInside = draggableShape.contains(e.getPoint());
        if (mouseInside) {
          if (lastMousePoint != null) {
            draggableShape.x += 
                e.getPoint().x - lastMousePoint.x;
            draggableShape.y += 
                e.getPoint().y - lastMousePoint.y; 
          }
        }
        lastMousePoint = e.getPoint();
        repaint();
      }

It is important to also update the lastMousePoint field before we exit the above method.

A tip for the champions. If you observe the previous class, you notice that the field lastMousePoint is only used within the adaptor. Ideally we move this field within the adaptor as highlighted below.

 addMouseMotionListener(new MouseMotionAdapter() {
      
      private Point lastMousePoint; 
      
      @Override
      public void mouseMoved(MouseEvent e) {
        mouseInside = draggableShape.contains(e.getPoint());
        lastMousePoint = e.getPoint();
        repaint();
      }

      @Override
      public void mouseDragged(MouseEvent e) {
        mouseInside = draggableShape.contains(e.getPoint());
        if (mouseInside) {
          if (lastMousePoint != null) {
            draggableShape.x += 
                e.getPoint().x - lastMousePoint.x;
            draggableShape.y += 
                e.getPoint().y - lastMousePoint.y;
          }
        }
        lastMousePoint = e.getPoint();
        repaint();
      }
    });

Too keep it simple, the above change will not apply to the rest of the examples

One last thing before we go. Note that we're able to drag the rectangle outside the component printable area. This is not always good and we would like to prevent this as illustrated below.

This is not a difficult change. All we need to do is cap the changes to the rectangle as illustrated in the following code fragment.

      @Override
      public void mouseDragged(MouseEvent e) {
        mouseInside = draggableShape.contains(e.getPoint());
        if (mouseInside) {
          if (lastMousePoint != null) {
            draggableShape.x += 
                e.getPoint().x - lastMousePoint.x;
            draggableShape.y += 
                e.getPoint().y - lastMousePoint.y;

            draggableShape.x = Math.max(draggableShape.x, 0);
            draggableShape.x = Math.min(draggableShape.x,
                getWidth() - draggableShape.width);
            draggableShape.y = Math.max(draggableShape.y, 0);
            draggableShape.y = Math.min(draggableShape.y,
                getHeight() - draggableShape.height);
          }
        }
        lastMousePoint = e.getPoint();
        repaint();
      }

The rest of the class is not listed for brevity.

Tuesday 10 November 2009

Capturing Tab key in GWT TextArea

A common thing developers have to deal with when using text areas in their web applications is the TAB key. Different from most of the other common web UI components, the text area component may require to capture the TAB key and "display" it as part of the text instead of transferring the focus to the next UI component in line.

This article will discuss how to capture the TAB key and prevent the transfer of focus within the text area. Technically speaking this code should happen within JavaScript, but this article makes use of the Google Web Toolkit (GWT). Here we're not going to discuss the pros and cons of GWT, but one should consider such API when developing JavaScript websites. Please refer to http://code.google.com/webtoolkit/ for more information about GWT.

For those of you who would only like to see the solution, please click here or scroll down to the bottom. For the others who would like to read about it; we'll start with a simple example and will be incrementing on it as we go along.

The Solution

We need to do the following things in order to capture the TAB key within the text area:

  • Listen to key (Key Down) events
  • Filter the TAB key (check if the TAB key is pressed)
  • Prevent the default action and stop event propagation
  • Insert the tab character at the current cursor position
  • Register the listener with the text area

Each of the above points are discussed, first individually and then merged together as one solution.

Key Down Event Handler

There are three types of key events (and handlers which handle the respective event):

  • Key Down
  • Key Up
  • Key Pressed

The first question that comes to mind is, why three? Very simple; there are situations, like ours, where you want to handle the events before they trigger other events (transfer focuse), while in other cases we just want to act after these happened, such as the key pressed event (spellchecker for example). In our case we want to disable the default behaviour from propagating any further and prevent the text area from losing its focus.

GWT provides the com.google.gwt.event.dom.client.KeyDownHandler interface that can be registered with a text area and is invoked by the text area whenever a key is pressed. To be precise, this handler is invoked when the key is down (the first from the three handlers mentioned above). The KeyDownHandler interface has only one method called onKeyDown() that expects one parameter of type: com.google.gwt.event.dom.client.KeyDownEvent. The following code fragment shows how to create a key down handler (Java - GWT).

KeyDownHandler handler = new KeyDownHandler() {
  @Override
  public void onKeyDown(KeyDownEvent event) {
    // Handle key down event here
  }
}
How come you're creating an instance of an interface? As you can see form the above example, Java allows to create new classes that extends or implements other classes and interfaces on-the-fly. These are called, anonymous inner classes. Anonymous, because the new class does not have a name. This is very convenient as you don't have to create a new class, but just implement in within the class you're using it.

We can now register the above handler with the text area as illustrated in the following code fragment

TextArea textArea = new TextArea();
textArea.addKeyDownHandler(handler); 

The numbered list shown above, lists this step as last. It doesn't make a difference when you register the handler, as long as the handler is initialised and not null.

Filter the TAB key

The onKeyDown() method is invoked by the text area every time a key is pressed while it's in focus. The text area will only invoke this method when you're typing in it. With that said, we only need to act when the TAB key is pressed. All the other keys are ignored. To do that, we have to filter the TAB by using the its ASCII decimal value: 9, as highlighted in the following code fragment.

KeyDownHandler handler = new KeyDownHandler() {
  @Override
  public void onKeyDown(KeyDownEvent event) {
    if (event.getNativeKeyCode() == 9) {
      // Handle TAB key down event here
    }
  }
}

The if statement will only yield true when the TAB key is pressed, otherwise false

Prevent the default action and stop event propagation

By default, when the TAB key is presses, the focus is transferred from the UI component that has it to the next com.google.gwt.user.client.ui.Focusable component. We have to prevent the default behaviour by invoking the methods preventDefault() and stopPropagation() on the KeyDownEvent instance provided as a parameter to the onKeyDown() method.

KeyDownHandler handler = new KeyDownHandler() {
  @Override
  public void onKeyDown(KeyDownEvent event) {
    if (event.getNativeKeyCode() == 9) {
      event.preventDefault();
      event.stopPropagation();
    }
  }
}

The above code will capture the TAB key events and will prevent the text area from losing its focus, but unfortunately will not print the TAB key in the text area. We have to programmatically add this key to the text area text as shown in the following section

Insert the tab character at the current cursor position

This should be the least of our problems but one must pay attention. Remember that the user may be editing in the middle of the document so we cannot just append the TAB at the end. We have to insert the TAB just right where the cursor is as highlighted in the following code fragment.

KeyDownHandler handler = new KeyDownHandler() {
  @Override
  public final void onKeyDown(KeyDownEvent event) {
    if (event.getNativeKeyCode() == 9) {
      event.preventDefault();
      event.stopPropagation();
      if(event.getSource() instanceof TextArea) {
        TextArea ta = (TextArea) event.getSource();
        int index = ta.getCursorPos();
        String text = ta.getText();
        ta.setText(text.substring(0, index) 
                   + "\t" + text.substring(index));
        ta.setCursorPos(index + 1);
      }
    }
  }
};

This can be easier said than done for some. So let's start line by line. We're first checking that the source is of type TextArea. We don't have to do this, but it will prevent an exception should someone else use this handler with another UI component that text area. Next, we're casting the source which triggered the event into a TextArea. Then we retrieved the cursor position (as an integer) and all its text in the line following that. Now, we split the text retrieved in two parts: the part before the cursor and the part following the cursor. We create a new string made from, the both parts delimited with the TAB character with is attaching both parts shown below.

ta.setText(text.substring(0, index) 
           + "\t" + text.substring(index));

Finally, we set the cursor location just after the TAB key, that is, one up in respect to the cursor before the key was pressed.

The Example

Complete example

public static final KeyDownHandler DEFAULT_TEXTAREA_TAB_HANDLER = new KeyDownHandler() {
    @Override
    public final void onKeyDown(KeyDownEvent event) {
      if (event.getNativeKeyCode() == 9) {
        event.preventDefault();
        event.stopPropagation();
        final TextArea ta = (TextArea) event.getSource();
        final int index = ta.getCursorPos();
        final String text = ta.getText();
        ta.setText(text.substring(0, index) 
                   + "\t" + text.substring(index));
        ta.setCursorPos(index + 1);
      }
    }
  };

Use

final TextArea textArea = new TextArea();
textArea.addKeyDownHandler(DEFAULT_TEXTAREA_TAB_HANDLER); 

Wednesday 28 October 2009

Practical Example of Entropy

This article is the fruit of a discussion held between Maura Paterson, Paulo Cardoso and myself about Shannon's entropy in information theory.

Entropy, H(x), can be thought of as a way of measuring how difficult it is to get an answer correct by guessing. In other words, entropy represents the uncertainty value. If the next outcome of the challenge at hand is certain (we all know what it will be), then the entropy is 0 as there is no uncertainty.

The entropy H(x), where the value of x is selected randomly from the set {x1, x2, ..., xn} (of size n) can be calculates using the following formula:

where b is the number of symbols in the target alphabet and p(xi) is the probability mass function of outcome xi. In this article the target alphabet is the binary alphabet which only contains two symbols: {0, 1}

Why are there two ways to calculate entropy? The first formula is the general formula and suites all scenarios, while the second formula (logb(n)) is only used when the elements in the set x have equal probability to be selected (the selection is not biased)

Example 1: If I pick a weekday (Sunday, Monday, Tuesday, Wednesday, Thursday, Friday, Saturday) uniformly at random, then ask you to guess which day I picked, the best you can hope to do is guess randomly, and the entropy is log2(7) = 2.81. In this example we've used the simplest part of the formula (logb(n)) as all elements had the same probability.

Example 2: However, if I pick a weekday using the distribution that I pick Sunday with probability 1/2, and each other day with probability 1/12 then we can use the formula to compute the fact that the entropy of this distribution is 2.29, i.e. the uncertainty is less than in the previous case. This value is calculated as follows:

-( 1/2×log2(1/2)
   + 1/12×log2(1/12) 
   + 1/12×log2(1/12)
   + 1/12×log2(1/12)
   + 1/12×log2(1/12)
   + 1/12×log2(1/12)
   + 1/12×log2(1/12) )
=
 -( 1/2×log2(1/2)     
  + 6/12×log2(1/12) )
= 2.29

This makes sense, because in the last scenario your best strategy is to guess that I've picked Sunday and you will be correct much more often than in the previous case.

Conditional Entropy

If you think in terms of bits, you need (almost) three bits to represent all the weekdays. Example:

000 = Sunday
001 = Monday
...
110 = Saturday
111 is not used.

Example 3: We established that the entropy H(x) of the original distribution was log2(7) = 2.81. Learning that the first bit is 0 gives you extra information, since we now know it can only be Sunday, Monday, Tuesday or Wednesday. In this case the entropy H(x|the first bit of x is 0) is log2(4) = 2 (since there are four equiprobable possibilities remaining). The extra information has reduced the uncertainty.

The entropy H(x|the first bit of x is 1) is log2(3) = 1.58. Thus if x is the variable representing the day of the week and y is the variable representing the first bit of the encoding we have that the conditional entropy H(x|y) = 4/7× log2(4) + 3/7×log2(3) = 4/7× 2 + 3/7×1.58 = 1.822. The first half of the equation: 4/7×2 represents the option when the first bit is 0 while the second half, 3/7×1.58, when the first bit is 1. So we see that in this case H(x) > H(x|y), so we can conclude that learning the first bit of the encoding does give you some information about x (it reduces the uncertainty over the value of x).

In order to be correct you'd need to see three bits, unless the first two bits you saw were 11, in which case you'd know the answer was 110, since we are not using the binary string 111. In fact this depends on the encoding you are using for each of the possibilities (for example, we could take the above encoding and add 10 zeros in front of each triple to get a new, very wasteful, encoding. In this case you'd have to see 13 bits most of the time.) However, the value of the entropy gives a lower bound on the expected number of bits that will be required no matter what encoding is used.

Tuesday 13 October 2009

Practical Example of Simple Java UI Component

In this article we'll discuss how to create a simple Java graphical component such as a javax.swing.JButton (without going into details of event handling) and include it within an application. Our component will display (paint) a flat rectangle of a set colour as illustrated below.

We'll be making use of two classes one representing the simple custom component and the other will be mounting the frame and including our component in it. All classes discussed here are saved under the package "com.albertattard.cgui". You can change this to your own package. In this article we'll only be exploring the creation of simple custom UI component. Many other related topics will be only mentioned here but not discussed. While you are encouraged to explore all the topics that are only mentioned (but not discussed) here, one must be cautious not to overwhelm him/herself in the process.

Custom UI Component

All Java Swing (don't worry if you don't know with Swing means but if you insist here is a link which may answer some of your questions: http://java.sun.com/docs/books/tutorial/uiswing/) graphical components inherit from the javax.swing.JComponent abstract class. Our component is no exception. So let's start by creating a simple class called: FlatRectComponent. This class will be extending the JComponent class mentioned earlier and will override the paintComponent() method as highlighted in the example below.

package com.albertattard.cgui;

import java.awt.Color;
import java.awt.Graphics;
import javax.swing.JComponent;

@SuppressWarnings("serial")
public class FlatRectComponent extends JComponent {
  @Override
  protected void paintComponent(Graphics g) {
    // Clear the previous screen
    super.paintComponent(g);
    // Set the painting colour to magenta
    g.setColor(Color.MAGENTA);
    // Draw a solid rectangle at coordinates x and y set to 
    // 10px with width and height set to 100px
    g.fillRect(10, 10, 100, 100);
  }
}
Why did we override the paintComponent() method? All UI programs are responsible from painting themselves on the screen. For example this article you're reading is an image displayed on your screen (unless you printed it on a piece of paper). The browser downloaded this article as HTML and transformed (or better rendered) it as an image. All other applications do the same. For example a button, is a simple set of paint instructions which makes it look real (as you see it on the screen). Also events, such as mouse hovering, may change the way the button or any other graphical component looks making the graphics interacting with the user inputs.

In the case of Java, all graphical components are responsible of painting themselves by overriding the paintComponent() method and paint on the provided java.awt.Graphics. In the above example, we're simply painting a flat rectangle in magenta. Then this method is called by some other class which displays it on the screen as you see it. You don't have to worry about how or what invokes this method. Just remember that you cannot call it yourself.

Alone this class is not of much use. But since it's inheriting from the JComponent class, we can include it with other Java Swing components such as javax.swing.JFrame.

Including it in a JFrame

Let's create a simple frame which will host our new component. For simplicity, we're not going to discuss Layout Managers. We're going to use the absolute layout where we specify the location and size for every component. An example of our frame class is shown below.

package com.albertattard.cgui;

import javax.swing.JFrame;
import javax.swing.SwingUtilities;

@SuppressWarnings("serial")
public class FrameDemo extends JFrame {

  private static void createFrame() {
    JFrame frame = new FrameDemo();
    frame.setDefaultCloseOperation(EXIT_ON_CLOSE);
    frame.setTitle("Custom UI Demo");
    frame.setSize(600, 400);
    frame.setLocationRelativeTo(null);
    frame.setVisible(true);
  }

  public static void main(String[] args) {
    SwingUtilities.invokeLater(new Runnable() {
      @Override
      public void run() {
        createFrame();
      }
    });
  }

  private FrameDemo() {
    // Set the layout of this frame to absolute layout
    setLayout(null);

    // Create the flat rectangle component and add it to 
    // the frame
    FlatRectComponent comp = new FlatRectComponent();
    comp.setBounds(0, 0, 200, 200);
    add(comp);
  }
}
The above class contains two static methods and a constructor. Let's analyse these further starting from the main() method. The main() method is the first method called by the JVM. This is from where the application starts. This method calls the other static method createFrame() by scheduling a job on the AWT event dispatching thread. This sounds as complex as rocket science but you have nothing to be afraid from. For now all you have to do is copy and paste it. The static method createFrame() creates an instance of our frame class, FrameDemo and set the frame properties, such as title, size and location.

The constructor of this class starts by setting the layout manager to absolute layout. Then it creates an instance of our components and set its size and location accordingly. The setBounds() method takes four parameters, the first two represent the location as x and y coordinate while the latter to represent the size. Finally it adds this component to its container (don't worry about containers for now - this is the fort time I'm asking to accept something as is without having to dig any further). This is a very important step. Many forget to add the components and then wonder why these don't appear in the frame.

How many instances of our component can we include in the frame? As many as you want. In practice there's a limit which is dependent on the amount of memory available to your application, but you don't have to worry about that neither as our application is fairly simple and consume very little memory. Let's amend the previous frame class and include another instance of the FlatRectComponent UI component. All we need to do is create another instance and adding this instance to the frame's container. We also need to set the bounds of the new component such that this don't conflict with the previous one as otherwise we may have a graphical issue. The following code fragment highlights the changes made to the frame class. Only the constructor was changed, the other methods are unchanged and thus not shown here. Also, note that a border was added to the components to visualise the component perimeter.

  private FrameDemo() {
    setLayout(null);

    // The first component
    FlatRectComponent comp1 = new FlatRectComponent();
    comp1.setBounds(0, 0, 200, 200);
    comp1.setBorder(
      BorderFactory.createLineBorder(Color.BLACK, 1));
    add(comp1);

    // The second component
    FlatRectComponent comp2 = new FlatRectComponent();
    comp2.setBounds(250, 50, 200, 200);
    comp2.setBorder(
      BorderFactory.createLineBorder(Color.BLACK, 1));
    add(comp2); 
  }
The program should now display two, identical, components as illustrated below.

Customising the Custom UI Component

As is, our component is not much of use as we cannot customise it. The painComponent() method make use of literals and constants and so our component will always look like that. In order to be able customise it we need to add some states to our custom UI component.

What are these? States in objects are instance fields, or as some call them: class variables. The instance fields are used to save the state of the object. The state of the object is all information about the object. For example our custom UI component displays a rectangle. This rectangle needs to have an x and y coordinates and a size. A rectangle cannot exist without these states (properties). Try to draw a rectangle on a piece of paper yourself without making use of the mentioned states. You'll notice that you cannot as, as soon as you draw it, you have provided the x, y and size states. In this case we need to capture these states in some instance fields. The same applies for the rectangle colour.

We can start by adding an instance of the java.awt.Rectangle class and save our rectangle states (size and location) there. Alternatively, we can create four integer variables which represent the x, y, width and height values for our rectangle. Even though it may sound more complex I suggest we go with the first option as this give us other functionality already available in the Rectangle class, which otherwise we have to program, such as the translate() method.

package com.albertattard.cgui;

import java.awt.Color;
import java.awt.Graphics;
import java.awt.Graphics2D;
import java.awt.Rectangle;
import javax.swing.JComponent;

@SuppressWarnings("serial")
public class FlatRectComponent extends JComponent {

  private Rectangle rect = new Rectangle(10, 10, 100, 100); 

  @Override
  protected void paintComponent(Graphics g) {
    super.paintComponent(g);

    // Make use of the 2D version of the Graphics component
    Graphics2D g2D = (Graphics2D) g; 

    g2D.setColor(Color.MAGENTA);
    g2D.fill(rect); 
  }
}
In the above example we've changed the way the rectangle is painted. Before we used literals, while now we're painting an instance of Rectangle. Also, now we're using a java.awt.Graphics2D component instead of the Graphics component. We're not going to go into much detail about this here as otherwise we'll be ending up writing a book. But in a nutshell, the Graphics2D inherits from the Graphics and adds more functionality (methods) which we can use. The object invoking out paintComponent() method (which we agreed not to discuss here) will be passing an instance of java.awt.Graphics2D to the paintComponent() method. All we're doing is recasting it back to its original form. Don't worry about this for now. All you need to know is that you should cast your Graphics to Graphics2D.

So far we have not yet provided any means (methods) which allow the rectangle instance field, rect, to be changed. That is, there is no way how one can change the x, y and size values for this instance. Let's add four methods, which can be used to set the any of the rectangle states.

package com.albertattard.cgui;

import java.awt.Color;
import java.awt.Graphics;
import java.awt.Graphics2D;
import java.awt.Rectangle;

import javax.swing.JComponent;

@SuppressWarnings("serial")
public class FlatRectComponent extends JComponent {

  private Rectangle rect = new Rectangle(10, 10, 100, 100);

  @Override
  protected void paintComponent(Graphics g) {
    super.paintComponent(g);

    Graphics2D g2D = (Graphics2D) g;

    g2D.setColor(Color.MAGENTA);
    g2D.fill(rect);
  }

  public void setHeight(int height) {
    rect.height = height;
    repaint();
  }

  public void setWidth(int width) {
    rect.width = width;
    repaint();
  }

  public void setX(int x) {
    rect.x = x;
    repaint();
  }

  public void setY(int y) {
    rect.y = y;
    repaint();
  }
}
Note that at the end of every setXXX() method we're calling the repaint() method. All we're doing here is instructing the frame's container (this is the guy which is invoking our paintComponent() method) to repaint this component. The frame's container will in turn call the paintComponent() method for this component and providing the appropriate information. It is important to do so after every change as otherwise your changes will not immediately appear. But these will appear only when the frame completely repaints all its components. Remember that you cannot call the paintComponent() yourself. All you can do is call the repaint() method.

So far we've only provided a means to customise our component. But we have not yet customized it. Let's do that. We can customise our component by calling the setXXX() from the frame class as highlighted bold below. The following code fragment only shows the constructor of the frame class as the other methods are unchanged.

  private FrameDemo() {
    setLayout(null);

    // The first component
    FlatRectComponent comp1 = new FlatRectComponent();
    comp1.setBounds(0, 0, 200, 200);
    comp1.setX(5);
    comp1.setY(5);
    comp1.setWidth(190);
    comp1.setHeight(190); 
    comp1.setBorder(
      BorderFactory.createLineBorder(Color.BLACK, 1));
    add(comp1);

    // The second component
    FlatRectComponent comp2 = new FlatRectComponent();
    comp2.setBounds(250, 50, 200, 200);
    comp2.setX(50);
    comp2.setY(50);
    comp2.setWidth(100);
    comp2.setHeight(100); 
    comp2.setBorder(
      BorderFactory.createLineBorder(Color.BLACK, 1));
    add(comp2);
  }
The above program should produce the following outcome.

Note that now the coloured rectangle size and location can be varied from the setter methods provided. This makes our component customizable. We can also change the paint colour by including an instance field representing the colour and a method in our custom UI component which changes the colour as illustrated below.

// imports not shown here 
public class FlatRectComponent extends JComponent {
  private Color rectColour = Color.MAGENTA; 

  // other field and methods are not show for brevity

  @Override
  protected void paintComponent(Graphics g) {
    super.paintComponent(g);

    Graphics2D g2D = (Graphics2D) g;

    g2D.setColor(rectColour); 
    g2D.fill(rect);
  }

  public void setRectangleColour(Color rectColour) {
    this.rectColour = rectColour;
    repaint();
  }
}
All we need to do now is call this method and change the colour accordingly as highlighted below.

  private FrameDemo() {
    setLayout(null);

    // The first component
    FlatRectComponent comp1 = new FlatRectComponent();
    comp1.setBounds(0, 0, 200, 200);
    comp1.setX(5);
    comp1.setY(5);
    comp1.setWidth(190);
    comp1.setHeight(190);
    comp1.setRectangleColour(Color.GREEN); 
    comp1.setBorder(
      BorderFactory.createLineBorder(Color.BLACK, 1));
    add(comp1);

    // The second component
    FlatRectComponent comp2 = new FlatRectComponent();
    comp2.setBounds(250, 50, 200, 200);
    comp2.setX(50);
    comp2.setY(50);
    comp2.setWidth(100);
    comp2.setHeight(100);
    comp2.setRectangleColour(Color.CYAN); 
    comp2.setBorder(
      BorderFactory.createLineBorder(Color.BLACK, 1));
    add(comp2);
  }

The following screenshot shows the final version of our program.

Conclusion

In this article we've saw how to create a simple custom Java UI component and display a simple flat rectangle. We've also added methods which can be used to customise this component.

Monday 12 October 2009

Generic close method

All resources need to be released once ready from them. This is usually done by invoking a close or dispose method depending on the object. These methods are usually invoked form the finally block following the try and catch blocks to ensure that the resources are released. Also, these methods may throw an exception during the process which we rarely use. But if we don't capture the exception the finally block will fail and not fully complete, failing to release the following resources.

Let say we're copying form one stream to another. Then we need to close both streams at the end of the process as illustrated below.

package com.albertattard.utils;

import java.io.IOException;
import java.io.InputStream;
import java.io.OutputStream;

public class CopyTwoStreams {

  public static void main(String[] args) throws IOException {
    InputStream in = null;
    OutputStream out = null;

    try {
      // copy code here
    } finally {
      in.close();
      out.close();
    }
  }

}

If an exception is thrown while closing the input stream, the output stream is never closed as the finally block will stop executing.

Handling Exceptions within the finally block

There are several ways how we can handle exceptions within the finally block. One alternative is to make use of a try and catch blocks but that may look bad (from a visual perspective). Alternatively, we can have a method which closes our streams and also absorbing any exceptions that may be thrown during the process.

As from Java 1.5, the java.io.Closable interface was introduce to the Java IO package and most (if not all) classes (and interfaces) in this package implement this interface. As you can see from the JavaDoc, this interface has only one method named close(). The good thing about this interface is that you can define one generic method which handles the close invocation. Following is a simple example:


public static IOException close(Closeable c){
  if(c != null) {
    try {
      c.close();
    } catch(IOException e) {
      return e;
    }
  }
  return null;
}

So now we can change our previous code to make use of this new static method. This method simply attempts the close a non-null closable object and returns null if either the object provided is null or it managed to close the object without any issues. Otherwise, the exception thrown in the process is returned (instead of propagated) to the caller.

package com.albertattard.utils;

import java.io.IOException;
import java.io.InputStream;
import java.io.OutputStream;

public class CopyTwoStreams {

  public static void main(String[] args) throws IOException {
    InputStream in = null;
    OutputStream out = null;

    try {
      // copy code here
    } finally {
      close(in);
      close(out);
    }
  }

}

Any exceptions thrown during the first close are absorbed and only returned by the new static close() method. These will not disrupt the flow of the finally block and all streams' close() methods are invoked.

Unfortunately the above method cannot be used with classes and interfaces that do not implement or inherit from the Closable interface. Classes and interfaces outside the Java IO package such as the interface java.sql.Connection cannot benefit from such a method.

A generic approach

By using reflection, we can retrieve the close() method and dynamically invoke it. Our generic method can be used with anything that has a method called close which takes no parameters, just like the method defined by the Closeable interface. The advantage of this approach is that we don't have to handle different close objects with different methods which basically do the same thing - simple close the object and absorbing any exceptions thrown in the process.

  public static Exception close(Object o){
  if(o != null) {
    try {
      Class<?> clazz = o.getClass();
      Method closeMethod = 
          clazz.getDeclaredMethod("close", new Class[0]);
      closeMethod.invoke(o, new Object[0]); 
    } catch(Exception e) {
      return e;
    }
  }
  return null;
}

We had to make some changes to our original static close() method to make use of reflection (highlighted in the above example). In a nutshell our Java classes, fields and methods are represented by other Java classes which we can use and invoke. A more comprehensive explanation about reflection can be found in this article Reflection in Action.

Conclusion

This short article illustrated how to write a simple generic method that can be used to invoke the close() method and return any exceptions thrown in the process. This approach makes use of reflection which adds flexibility but also add performance costs. This is the slowest approach for closing an object.

Monday 10 August 2009

Install Eclipse UI Form Editor

Developing Swing (or any other GUI) forms can be cumbersome and time consuming especially if you're a newbie or have complex screens to build. Form editors such as NetBeans Matisse or Eclipse plugin Jigloo can help you speed up the development time by providing a simple drag and drop form building. In this article we’re not comparing the form builders and in no way I'm saying that the mentioned form builders are better than others.

This article shows you how to installed CloudGarden's Jigloo plugin for Eclipse Galileo 3.5. The contents can be used also as a guide on how to install and remove plugins from Eclipse. Note that different versions of Eclipse may use different dialogs and include different options.

It is assumed that the computer you’re installing the plugin is connected to the Internet and have access to the following URI: http://cloudgarden1.com/update-site.

Install Jigloo Plugin

Eclipse provides a framework for its plugins. This simplifies the installation and removal process of plugins such as Jigloo. Open Eclipse, if not already opened. To add a new plugin, open the Help menu and select the Install New Software... menu item.

Help -> Install New Software

The Install dialog will open from where you can add and install new plugins. Click on the Add... button to add a new site from where the plugin is downloaded and installed as shown in the following screenshot.

Add Site

Add the site details in the small dialog, titled Add Site, displayed. Enter a friendly name (it can be anything you like) and the location from where the plugin will be downloaded and installed. The location for Jigloo is: http://cloudgarden1.com/update-site.

Enter Site Details

Click OK to continue. As shown in the following screenshot, the new site may not be listed in the work with dropdown list.

Work With dropdown list (without the Jigloo site)

In this case, close the dialog and reopen it from the menu Help -> Install New Software... as described earlier (click here for details) for Eclipse to refresh the sites list. The new site will be displayed in the work with dropdown list. Select the Jigloo site and click Next to continue.

Work With dropdown list (with the Jigloo site)

Eclipse will list all available plugins from the selected site. Select the Jigloo GUI Builder and then click Next > to continue.

Add Jigloo

Wait for Eclipse to calculate the requirements and dependencies. When ready, Eclipse will list the installation details. Click Next > to continue. Read the license agreement and only proceed if you accept it. Eclipse will download the required files and installed these when ready.

Wait for Eclipse to Download and Install

When ready, a dialog will be displayed suggesting restart of Eclipse. Click Yes to restart Eclipse. Wait for Eclipse to restart.

Create a JFrame

The main focus of this article is to illustrate how to install and remove Eclipse plugin Jigloo. The following online tutorial: http://www.cloudgarden1.com/swing_tutorial/index.html provides detailed examples of how to use this plugin to create Swing based forms.

To create a new JFrame, we first need to create a new project (unless you have one created already). Create a project or select an existing one. Then press Ctrl+N simultaneously to open the New dialog. Expand the GUI Forms node, then the Swing node and select the JFrame option as shown below.

New JFrame

If the form is greyed out (disabled) that means that you have not selected a project. Make sure you either select an existing project or create a new one before you proceed.

Provide a package name and a name for the JFrame. Note that names in Java must start with a letter, underscore or a dollar sign. Numbers can be included but not as the first letter. Press Finish to complete the process.

Package and Frame names

Eclipse will open the new frame for editing. Components can be added and removed graphically in a drag and drop manner. For more about this, please refer to the tutorial: http://www.cloudgarden1.com/swing_tutorial/index.html

Eclipse

Uninstall the Plugin

To uninstall a plugin, open the Help menu and select About Eclipse menu item. The about dialog will be displayed.

Click on the Installation Details button. The Eclipse Installation Details dialog will open. With the Installed Software tab selected, select the Jigloo plugin and click Uninstall….

Uninstall

Wait for Eclipse to calculate the requirements and dependencies. Click Finish on the Uninstall dialog to confirm the uninstallation. Wait for Eclipse to finish the uninstallation and click Yes when prompting to restart.