Thursday, 28 June 2012

Eclipse GWT Plugin Update Sites

This article lists all GWT Plugins available for various versions of the Eclipse IDE (or any development tool built on Eclipse such as SpringSource Tool Suite). The official GWT Plugin page (https://developers.google.com/eclipse/docs/download) now (2012-07-02) includes the latest version of the plugin together with all previous versions.

The following table lists the updates links for various versions of Eclipse.

Eclipse 4.2 (Juno) http://dl.google.com/eclipse/plugin/4.2
Eclipse 3.7 (Indigo) http://dl.google.com/eclipse/plugin/3.7
Eclipse 3.6 (Helios) http://dl.google.com/eclipse/plugin/3.6
Eclipse 3.5 (Galileo) http://dl.google.com/eclipse/plugin/3.5

Please refer to the GWT Plugin (https://developers.google.com/eclipse/docs/download) for further information about how you can install it.

Saturday, 23 June 2012

Practical Example of GSON (Part 2)

Please note that this page has moved to: http://www.javacreed.com/gson-deserialiser-example/.

The first article I wrote about GSON (part 1) is (at the time of writing) the most popular article in my small blog. Thus, I decided to write a second article and add more practical and advance examples which anyone can use. As also noted in my previous article, the official GSON site is: http://sites.google.com/site/gson/.

In this article we will see how to parse complex JSON objects into existing Java objects that do not necessary have the same structure as the JSON object. We will see how the use of the GSON deserialiser (JsonDeserializer) in order to control how the JSON object maps to the Java object.

The code shown here is all available at: http://code.google.com/p/gson-practical-examples/source/checkout.

The readers are encouraged to first read part 1 before proceeding, unless they are already familiar with GSON.

A Simple Example

Let's say we have the following JSON object, where it contains four Java books titles written by various, well known, authors.

{
    '1': 'Effective Java (2nd Edition)',
    '2': 'JavaTM Puzzlers: Traps, Pitfalls, and Corner Cases',
    '3': 'Java Concurrency in Practice',
    '4': 'Java: The Good Parts'
}

Note that each name/value pair has a number as its name and the book title as its value. Using the methods discussed in part 1 would create a problem. In that article, Gson is expecting to find variable names in Java with the same name as that found in JSON. But names in Java cannot start with a number. They can contain a number, but cannot start with one (as described in chapter 6 of the Java Language Specification).

So how can we parse this JSON object and use it in Java?
We can use the JsonDeserializer to parse the JSON object into our Java object the way we want it. Using the JsonDeserializer, we have full control over how JSON is parsed as we will see in the following example.

Consider the following simple Java object.


package com.albertattard.examples.gson.part2_1;
import java.util.ArrayList;
import java.util.List;

public class Books {

  private List<string> booksTitles = new ArrayList<>();

  public void addBookTitle(String title) {
    booksTitles.add(title);
  }

  @Override
  public String toString() {
    return booksTitles.toString();
  }
}

This Java object will be used to hold the books listed in the JSON object shown earlier. Note that JSON object has four fields, one for each book, while the Java object has a list in which these books are saved. The structure of these two objects (Java and JSON) is different.

In order to be able to parse JSON to Java we need to create our own instance of the JsonDeserializer interface as shown next.


package com.albertattard.examples.gson.part2_1;
import java.lang.reflect.Type;
import com.google.gson.JsonDeserializationContext;
import com.google.gson.JsonDeserializer;
import com.google.gson.JsonElement;
import com.google.gson.JsonParseException;

public class BooksDeserializer implements JsonDeserializer<Books> {

  @Override
  public Books deserialize(final JsonElement json, 
        final Type typeOfT, 
        final JsonDeserializationContext context) 
        throws JsonParseException {

    Books books = new Books();
    // Parsing will be done here.
    return books;
  }
}

The above example is not complete and we still need to add the most important thing, which is the parsing. But let's understand this class before we make it more complex by adding more code to it. The interface JsonDeserializer requires a type, which is the type of object that we will be parsing. In this case, we are parsing JSON into the Java object of type Books. The return type of the deserialize() method must be of the same type as the interface parameter, Books.

How does this work?
Gson will parse the JSON object into a Java object of type JsonElement. The JsonElement can be thought of a tree of name/value pairs containing all elements found in the JSON object. Each child within the JsonElement is yet another JsonElement. In other words we have a tree of JsonElements. Through this object we can retrieve each JSON element by its name and set the Java object accordingly. The following example shows how we can retrieve the first book listed in the JSON object and add it to the Java object.


package com.albertattard.examples.gson.part2_1;
import java.lang.reflect.Type;
import com.google.gson.JsonDeserializationContext;
import com.google.gson.JsonDeserializer;
import com.google.gson.JsonElement;
import com.google.gson.JsonObject;
import com.google.gson.JsonParseException;

public class BooksDeserializer implements JsonDeserializer<Books> {

  @Override
  public Books deserialize(final JsonElement json, 
        final Type typeOfT, 
        final JsonDeserializationContext context) 
        throws JsonParseException {
    Books books = new Books();

    JsonObject jsonObject = json.getAsJsonObject();
    books.addBookTitle(jsonObject.get("1").getAsString());

    return books;
  }
}

In the above example, we are retrieving the JSON element with name "1" using the following code fragment:

jsonObject.get("1")

This returns the JsonElement with the name: "1". In this case it is a simple String. Note that in order to retrieve the actual value we need to invoke another method on the JsonElement instance, which returns the value we need, String in this case.

jsonObject.get("1").getAsString()

The rest of the books titles can be retrieved in the same manner.

Before we can utilise our new deserializer, we must instruct GSON to use our deserializer when parsing objects of type Books, as shown in the next code example.


package com.albertattard.examples.gson.part2_1;
import java.io.InputStreamReader;
import com.google.gson.Gson;
import com.google.gson.GsonBuilder;

public class Main {
  public static void main(String[] args) throws Exception {
    // Configure GSON
    GsonBuilder gsonBuilder = new GsonBuilder();
    gsonBuilder.registerTypeAdapter(Books.class,
        new BooksDeserializer());
    Gson gson = gsonBuilder.create();

    // The JSON data
    Reader data = new InputStreamReader(
        Main.class.getResourceAsStream("books.json"), "UTF-8");

    // Parse JSON to Java
    Books books = gson.fromJson(data, Books.class);
    System.out.println(books);
  }
}

In the above example, we are creating an instance of Gson through the GsonBuilder. Using the registerTypeAdapter() method, we are registering our deserializer and instructing GSON to use our deserializer when deserializing objects of type Books. When we request GSON to deserialize an object to the Books class, GSON will use our deserializer . The following list describes what happens when we invoke: gson.fromJson(data, Books.class).
  1. Parse the input as JsonElement. At this stage, the string JSON object is changed into a generic Java object of type JsonElement. This step also ensures that the given JSON data is valid.
  2. Find the deserializer for the given object, in this case the BooksDeserializer instance.
  3. Invokes the method deserialize() and provides the necessary parameters. In his example, our deserialize() will be invoked. Here an object of type Books is created from the given JsonElement object. This is from Java to Java conversion.
  4. Returns the object returned by the deserialize() method to the caller of the fromJson() method. This is like a chain, where GSON receives an object from out deserializer and returns it to its caller.
Running the above example would print the following:

[Effective Java (2nd Edition), JavaTM Puzzlers: Traps, Pitfalls, and Corner Cases, Java Concurrency in Practice, Java: The Good Parts]

This concludes our simple example. This example acts as a primer for other complex parsing. For example, parsing JSON objects that include nested objects, arrays and the like. In the next example we will discuss an enhanced version of the objects discussed here.

Nested Objects

In this example we will describe how to parse nested objects, that is, objects within other objects. Here we will introduce a new entity, the author. A book, together with the title and ISBN can have a list of authors. On the other hand every author can have many books. The JSON object that will be using in this example differs from the previous one to cater for the new entity as shown next:

{
  '1': {
    'title': 'Effective Java (2nd Edition)',
    'isbn': '978-0321356680',
    'authors': ['Joshua Bloch']
  },
  '2': {
    'title': 'JavaTM Puzzlers: Traps, Pitfalls, and Corner Cases',
    'isbn': '978-0321336781',
    'authors': ['Joshua Bloch', 'Neal Gafter']
  },
  '3': {
    'title': 'Java Concurrency in Practice',
    'isbn': '978-0321349606',
    'authors': ['Brian Goetz', 'Tim Peierls', 'Joshua Bloch', 
                'Joseph Bowbeer', 'David Holmes', 'Doug Lea']
  },
  '4': {
    'title': 'Java: The Good Parts',
    'isbn': '978-0596803735',
    'authors': ['Jim Waldo']
  }
}

We still have our four books, only this time we have a more complex and detailed JSON object. Instead of a simple book title, we also have an ISBN and an array of authors.

The new example provides new challenges. One of the authors, Joshua Bloch, has three books. This immediately leads to the following question.

How many instance of this author should we have?
There are two possible answers for this question: just one or three (one for every book). There is no one correct answer, and both cases can be valid. In our examples we are going to have one instance of the author even when he or she has more than one book. We are taking this approach as this approach resembles the reality and helps highlighting the goal of this article (GSON examples). Therefore we will have one author object representing the author Joshua Bloch.

For this example we will be using three domain objects:

  • Author
  • Book
  • Books
All three objects have references to the other objects. For example, the Author class has a list of Books and the Book has a list of Authors. The Books class contains all parsed objects. The Books class also provides the functionality required to maintain one instance for each author as we will see later on in this example.

Author


package com.albertattard.examples.gson.part2_2;
import java.util.HashSet;
import java.util.Set;

public class Author {

  private Set<Book> books = new HashSet<>();
  private String name;

  public Author(final String name) {
    this.name = name;
  }

  public void addBook(Book book) {
    books.add(book);
  }

  public Set<Book> getBooks() {
    return books;
  }

  public String getName() {
    return name;
  }

  @Override
  public String toString() {
    return String.format("%s has %d book(s)", name, books.size());
  }
}

Book


package com.albertattard.examples.gson.part2_2;

import java.util.Arrays;
import java.util.HashSet;
import java.util.Set;

public class Book {

  private Set<Author> authors;
  private String isbn;
  private String title;

  public Book(String title, String isbn, Author... authors) {
    this.title = title;
    this.isbn = isbn;
    this.authors = new HashSet<>(Arrays.asList(authors));
  }

  public Set<Author> getAuthors() {
    return authors;
  }

  @Override
  public String toString() {
    StringBuilder fomrattedString = new StringBuilder();
    fomrattedString.append(title).append(" (").append(isbn)
        .append(")");

    fomrattedString.append(" by: ");
    for (Author author : authors) {
      fomrattedString.append(author.getName()).append(", ");
    }

    // To remove the last comma followed by a space
    return fomrattedString.
             substring(0, fomrattedString.length() - 2);
  }
}

Books


package com.albertattard.examples.gson.part2_2;

import java.util.HashMap;
import java.util.HashSet;
import java.util.Map;
import java.util.Set;

public class Books {

  // A map of authors index by their name.
  private Map<String, Author> authors = new HashMap<>();
  private Set<Book> books = new HashSet<>();

  public void addAuthor(Author author) {
    authors.put(author.getName(), author);
  }

  public void addBook(Book book) {
    books.add(book);
  }

  public Author getAuthorWithName(String name) {
    return authors.get(name);
  }

  @Override
  public String toString() {
    StringBuilder formattedString = new StringBuilder();
    for (Author author : authors.values()) {
      formattedString.append(author).append("\n");
      for (Book book : author.getBooks()) {
        formattedString.append("  ").append(book).append("\n");
      }
      formattedString.append("\n");
    }

    return formattedString.toString();
  }
}


Coming soon.
This article is not complete and more information will follow shortly.

Friday, 17 June 2011

Why should we use dependency injection?

Please note that this page has moved to: http://www.javacreed.com/why-should-we-use-dependency-injection/.

In this article we will explore some of the benefits of dependency injection and how this can be used in all types of programming, including small and simple programs. Some of the example shown below make use of Guice, a dependency injection framework by Google. The same concept applies for any other dependency injection framework.

This article does not provide detailed description of Guice but it only focus on the benefits of dependency injection and design methods that improve modularity, extendibility and testing.

What is dependency injection?

Let say we want to make some tea. How would we do it and what do we need? We need to boil some water, a clean mug, tea bags, sugar and milk (at least that's what I put into mine). In order to make tea we need to provide all these ingredients and we need to manage all these ourselves. We have to fill the kettle with water and heat it up, get the milk from the refrigerator and get the rest.

Now assume that we can make tea, by simply asking someone else to do it for us. Someone that knows how to do the tea just the way we want it. Would that be better than making the tea ourselves? If yes, then welcome to dependency injection.

Dependency injection is a framework that takes care of creating objects for us without we having to worry about providing the right ingredients so to say.

A Simple Example

Let say we have a class, Person, and this class needs to send a message. The Person class requires the aid of some other class, Email, in order to send a message. Following is a simple way of doing this.

public class Email {
  public void sendEmail(String subject, String message){
  }
}

public class Person {
  private Email email = new Email();

  public void greetFriend(){
    email.sendEmail(parameters...);
  }
}

Some code is omitted from the above classes for brevity

We all agree that this is a very simple and straight forward example that involves two simple Java classes. Nevertheless, the above has some limitations as listed below.

  • The Persons class is dependent (has a strong/tight dependency) on the Email class. There is a hard connection between these two classes. Let say we have a new better version of email class, FastEmail, in order for us to use it, we need to go in each and every class that depends on the Email class, such as the Person class, replace it with the new version.
  • Let say we parametrise the Email's constructor. Again we have to go in each and every class that is initialising the Email class, such as the Person class, and change it.
  • A design decision is taken to make the Email class singleton. Similar to above we need to modify all instances where it is used.
  • In order to improve the notifications/messages system, we decide to add different message delivery systems such as SMS or tweets. The Person class and other like it, need to all be modified in order for it to use the new classes.
  • Another developer needs to use the Person class, but would like to use a different notification/message system. This cannot be achieved with the current version of the Person class as it is hardwired to the Email class. What generally happens is that the other developer duplicates the Person class and modifies it as he/she needs. The projects ends up with two versions of the Person class.
  • In the above points we mentioned many scenarios where code has to be changed. All changes made, need to and should be tested. How can we test the Person class without including the message delivery class such as the Email? Testing, in many cases, is left as an afterthought. The way we have the Person class constructed makes it hard to test it without involving the Email class. Furthermore, how would we automate such test? How can we use JUnit or the like to automate out tests?
  • Moving forward in the project, the Person class starts to depend on another class that allow this object to write a letter using the Pen class for example. The Person class can use other ways to write a letter, such as Pencil class or Typewriter class, but this approach does not allow that.

These limitations can be improved by changing the way we think and restructure our code in a modular way. This is independent from dependency injection as we will see in the following section.

Change the way we think

The Email class provides a service, that is, sending of messages over the Internet using the mail protocol. Instead of having the Person class initialising an instance of the Email class, we first create an interface, MessageService, and make the Person class using this interface instead. This removed the dependency that the Person class has on the Email and replaces it with an abstract message delivery interface.

The following three steps: define, implement and use, show how we can develop modular and extendable code. This approach also improves testing as we will see at the end of this article.

  1. Define Interfaces

    Many developers do not use interfaces as they see them as additional non-required code. This may be true (I said maybe as the System class makes use of interfaces) for the famous hello world program, definitely not true for the rest. Like with everything else, we have to see things in context and there will be cases when we can do without interfaces. Nevertheless, developing code using interfaces produce far more modular and extendable code as illustrated in the following examples. The example discussed in the previous section was quite simple, but nevertheless it included several pitfalls which can be easily avoided. Changing code at a later stage involves more work than having it right in the first place.

    We start by defining the MessageService interface that includes one method, sendMessage(String subject, String message). For simplicity we assume that no exceptions are thrown.

    public interface MessageService {
      void sendMessage(String subject, String message);
    }
    
  2. Implement Interfaces

    In the list of limitations we mentioned four possible methods of sending a message: email, fast email, SMS and tweet. Let's create four classes that handle each message delivery method and have all these classes implement the interface created above.

    public class EmailService implements MessageService {
      @Override
      public void sendMessage(String subject, String message){
        System.out.printf("Email: %s, %s%n ", subject, message);
      }
    }
    
    public class FastEmailService implements MessageService {
      @Override
      public void sendMessage(String subject, String message){
        System.out.printf("Fast Email: %s, %s%n ", subject, message);
      }
    }
    
    public class SMSService implements MessageService {
      @Override
      public void sendMessage(String subject, String message){
        System.out.printf("SMS: %s, %s%n ", subject, message);
      }
    }
    
    public class TweetService implements MessageService {
      @Override
      public void sendMessage(String subject, String message){
        System.out.printf("Tweet: %s, %s%n", subject, message);
      }
    }
    
  3. Use Interfaces

    Finally, instead of using classes, we use interfaces. In the Person class, we replace the Email field with the MessageService service interface as shown in red below.

    public class Person {
      private MessageService messageService;
    
      public Person(MessageService messageService){
        this.messageService = messageService;
      }
    
      public void greetFriend(){
        messageService.sendMessage(parameters...);
      }
    }
    

    Note that the Person class is not initialising the message service but it is expecting it as a parameter of its constructor. This is a key element in the design. It improves modularity, extendibility and testing. The Person class is not dependent on any implementation, but on a service defined by an interface. This means that we can use the Person class without having to worry about the underlying implementation. Furthermore, different Person instance can be instantiated using different message services.

One can argue that the new version of Person class became more complex to instantiate as it requires parameters. This is a fair statement and here is when dependency injection comes into play.

Using Dependency Injection

As mentioned in the introduction, dependency injection can help us initialising objects and provide these objects all the necessary resources (ingredients). For example, the Person class requires an instance of MessageService. The dependency injection framework will provide that for us. So to create an instance of Person, all we need to do is call something like: dependecyFramework.getInstance(Person.class). Magically, (not really), the dependency injection framework will create an instance of the Person class and provide an instance of the a MessageService to the Person object.

The next natural question will be, how does the dependency injection framework knows how to initialise the MessageService? We need to tell the dependency injection framework how to create an instance of MessageService. With Google Guice we do that by creating a module (extends AbstractModule ) as illustrated below:

public class ProjectModule extends AbstractModule {

  @Override
  protected void configure() {
    bind(MessageService.class).to(EmailService.class);
  }
}

Here we are telling the dependency injection how to create an instance of the MessageService class. We also need to add an annotation to the Person class in order to allow the dependency injection framework to inject the necessary parameters.

public class Person {
  private MessageService messageService;

  @Inject
  public Person(MessageService messageService){
    this.messageService = messageService;
  }

  public void greetFriend(){
    messageService.sendMessage(parameters...);
  }
}

With everything set, we create an instance of the Person class using the dependency injection framework

Injector injector = Guice.createInjector(new ProjectModule());
  Person person = injector.getInstance(Person.class);
  person.greetFriend();

We replaced a couple of lines of code with many others. What's the buzz about this? In the next section we will see some of the benefits of dependency injection and how this can be used to simplify our coding life

Benefits of Dependency Injection

In this section we will see some key benefits of dependency injection

  • Changing the message service

    Let's change the delivery method from email to SMS. How would we do that?

    We only need to change the ProjectModule class to map the MessageService class to the SmsService class as shown in red below.

    public class ProjectModule extends AbstractModule {
    
      @Override
      protected void configure() {
        bind(MessageService.class).to(SmsService.class);
      }
    }
    

    This one change will affect all classes initialised with the dependency injection framework without having to change any of these classes. This leads us to another advantage, testing.

  • Changing the message service

    We can create a MockService class which can be using in JUnit test as shown next.

    public class MockService implements MessageService {
    
      public String subject;
      public String message;
    
      @Override
      public void sendMessage(String subject, String message) {
        this.subject = subject;
        this.message = message;
      }
    
    }
    

    The above mock message service simply stores the parameters into two public fields. These fields can be used to retrieve the values of the parameters and used for testing ass illustrated next.

    public class TestPerson {
    
      private Injector injector;
    
      @Before
      public void init() {
        injector = Guice.createInjector(new AbstractModule() {
          @Override
          protected void configure() {
            bind(MockMessageService.class).in(Singleton.class);
            bind(MessageService.class).to(MockService.class);
          }
        });
      }
    
      @Test
      public void testGreetFriend() {
        Person person = injector.getInstance(Person.class);
        person.greetFriend();
    
        MockService mockService = injector
            .getInstance(MockService.class);
        assertEquals("Greet", mockService.subject);
        assertEquals("Hello my friend", mockService.message);
      }
    }
    

    This may require some explanation. So here we go. We created an injection (Guice dependency injection) just for this testing and provided a custom module (as an abstract inner anonymous class). The custom module wires the MessageService with the MockService instead. Also, we set the MockService as singleton, that is, whenever we request an instance of this class from the injection we always get the same object (singleton). After greetFriend() is invoked, we test using JUnit to make sure that the correct parameters are being passed to the message service instance.

    This design setup allows us to test the Person class independent from the other classes that it depends on in an automated manner.

  • Changing the signature of the Person constructor

    As we mentioned in the limitations, the Person class may evolve and include more functionality. Changing the signature of the Person constructor will not affect us as long as the injector knows how to provide the required parameters.

    public class Person {
      @Inject
      public Person(MessageService messageService, 
                    WritingService writingService){
      }
    }
    

    The Person class will still be initialised in the same way as it is now. Thus changing the Person constructor signature will not affect the other classes that make us of it.

    Person person = injector.getInstance(Person.class);
    

    The same applies for anything that is initialised and handled through the injector.

  • Passing the Injector as parameter

    In a project we can have one instance shared throughout the project. This can be achieved by passing the Injector as a parameter to other objects that needs it. We setup the injector at the beginning (in a main method for example), and then have it set as a constructor parameter in all the classes that require an instance of the injector. Like that one injector will server all classes in the project.

Conclusion

This ended up to be quite a long article. Dependency injection is quite simple to use and it has quite a "shallow" learning curve. This article does not explain how to use the actual dependency injection framework (such as Guice). Articles about that are easily found. This article described key benefits of using a dependency injection framework even in small projects.

Saturday, 11 June 2011

OutOfMemoryError when reading large volumes of records from MySQL

When loading a large number of records from MySQL, an out of memory error (exception) may be thrown by the MyQSL connector. The connector reads all the data in memory (buffering) before it returns the result set. This may not be the case for other JDBC providers.

The follow code fragment will fail on the third line (shown in red) when invoking the executeQuery() method if the memory required to load the whole result is larger than the allocated heap size.

Statement statement = connection.createStatement();
ResultSet resultSet = 
    statement.executeQuery("SELECT * FROM `large_table`");
while(resultSet.next()){
}

One possible solution is to increase the heap size but this may not be required, especially if you are accessing small parts from the result set at one time. Increasing the heap size will only allow the program to consumes more resources that it actually requires.

The MYSQL statement interface (com.mysql.jdbc.Statement) provides a method called enableStreamingResults() which enables streaming over buffering, (as shown in red in the following code fragment).

Statement statement = connection.createStatement();
// This prevents the MYSQL connector from loading all the 
// results into memory
((com.mysql.jdbc.Statement) statement).enableStreamingResults();
ResultSet resultSet = 
    statement.executeQuery("SELECT * FROM `large_table`");
while(resultSet.next()){
}

This allows the code to read from a large table without consuming a large amount of memory.

Friday, 9 July 2010

In line images

Many web sites include small images and icons in tool bars and menus. These images are downloaded one by one by the browser while the page is downloaded. In many cases, the establishing of connection is more expensive in terms of time and traffic than the actual image. By converting these images to base64 encoding text, the browser can download the page content and the images at one go. Here’s is the code of how to convert an image into a base64 string.

public static String convertToInLineImage(
    byte[] image, String type) {
// Convert a byte array to base64 string
char[] chars = new sun.misc.BASE64Encoder().
                    encode(image).toCharArray();
StringBuilder builder = new StringBuilder();
for (char c : chars) {
 switch (c) {
   case '\n':
   case '\r':
   continue;
 default:
   builder.append(c);
 }
}

return "data:" + type + ";base64," + builder.toString();
}

The above method simple converts an image from bytes into string. The string returned by this method should be placed within the image HTML style.

style="width:50px;
      height:50px;
      background:url('the-base64-string-here')
          no-repeat scroll 0px 0px transparent;"

Monday, 28 December 2009

Upgrade to GWT 2

To upgrade the Eclipse Plugin to GWT 2, is an easy process. Unfortunately GWT is installed with the default name, GWT, GWT (1), GWT (2) and so on, for any different release. Ideally, the name used is a meaning full one, such as GWT 1.7.1 and GWT 2.0.0.

In this short article we discuss who to rename an existing GWT Eclipse Plugin and install GWT 2

Rename the existing GWT Eclipse Plugin

This step is optional.

By default, the GWT Eclipse plugin is installed with the name GWT as shown in the following figure. This can be misleading especially if you have multiple versions installed. Unfortunately, the name cannot be changed once installed. The only way to rename it is to remove it and then add it again with the proper name.

To rename the GWT Eclipse Plugin, please follow the steps below:

  1. From the menu, open Window > Preferences
  2. Expand the Google node and select the Web Toolkit

    As you can notice, the name set to GWT.
  3. Select it and click the Remove button
  4. Once removed, click the Add button
  5. A dialog will open. Click the Browse button to locate the current GWT Eclipse plugin

  6. Browse to the GWT Eclipse plugin folder. This is usually found at: C:\Program Files\Eclipse\eclipse-jee-galileo-SR1-win32\plugins\com.google.gwt.eclipse.sdkbundle.win32_1.7.1.v200909221731\gwt-windows-1.7.1.

    Note that the version numbers may be different depending on the version you have installed.

  7. Set the display name to correspond to the version, GWT X.X.X, and press OK

  8. Press OK to complete the process

This complete the renaming process.

Install the GWT 2 Eclipse plugin

This is installed as any other new Eclipse plugin.

  1. From the menu, open Help > Install New Software.... Make sure to select the Install New Software... and NOT Check for Updates
  2. Select the Google Eclipse URL: http://dl.google.com/eclipse/plugin/3.5 (for Eclipse 3.5), check both the Plugin and SDK options and press Next as shown in the image below.

  3. Next, Next, ..., Next through the installation. Once ready, restart Eclipse.

The GWT 2 Eclipse plugin is installed, with the name GWT. It is recommended to rename it to GWT 2.0.0 following the steps above discussed.

Draft Compile

One of the new features available in GWT2 is the draft compile, which is ideal for development as it skips the optimisation processes carried out by the compiler reducing the compile time. This is a great feature for development, but the production code SHOULD NOT be compiled in this mode.

To make use of this feature, simple add the -draftCompile to the advance compiler options as illustrated below.

Thursday, 17 December 2009

Simple Java WAV Player

In this article we'll discuss a simple way how to play wav files in Java. We'll start with the complete example and explain each bit in the process. This example only involves one class, the one listed below.

package com.albertattard.pmm;

import java.io.FileInputStream;
import java.io.FileNotFoundException;
import java.io.IOException;
import java.io.InputStream;
import javax.sound.sampled.AudioFormat;
import javax.sound.sampled.AudioInputStream;
import javax.sound.sampled.AudioSystem;
import javax.sound.sampled.DataLine;
import javax.sound.sampled.LineUnavailableException;
import javax.sound.sampled.SourceDataLine;
import javax.sound.sampled.UnsupportedAudioFileException;

public class TheMusicPlayer {

  public static void play(final InputStream inputStream) {
    new Thread() {
      @Override
      public void run() {
        AudioInputStream audioInputStream = null;
        try {
          audioInputStream = AudioSystem
              .getAudioInputStream(inputStream);
        } catch (UnsupportedAudioFileException e) {
          e.printStackTrace();
          return;
        } catch (IOException e) {
          e.printStackTrace();
          return;
        }

        SourceDataLine sourceDataLine = null;
        try {
          AudioFormat audioFormat 
              = audioInputStream.getFormat();
          DataLine.Info info = new DataLine.Info(
              SourceDataLine.class, audioFormat);
          sourceDataLine = 
              (SourceDataLine) AudioSystem.getLine(info);
          sourceDataLine.open(audioFormat);
        } catch (LineUnavailableException e) {
          e.printStackTrace();
          return;
        }

        sourceDataLine.start();
        byte[] data = new byte[524288];// 128Kb
        try {
          int bytesRead = 0;
          while (bytesRead != -1) {
            bytesRead = 
                audioInputStream.read(data, 0, data.length);
            if (bytesRead >= 0)
              sourceDataLine.write(data, 0, bytesRead);
          }
        } catch (IOException e) {
          e.printStackTrace();
          return;
        } finally {
          sourceDataLine.drain();
          sourceDataLine.close();
        }
      }
    }.start();
  }

  public static void play(final String wavFile)
      throws FileNotFoundException {
    play(new FileInputStream(wavFile));
  }
}

Those of you who are in a hurry, just copy and paste the above code and get on with your life. The others who can spare sometime, just read the following part.

Explained

The class has two static overloaded methods which play the wav file provides as a parameter. The second method simple invokes the first method passing an instance of input stream (and instance of FileInputStream, which inherits from InputStream)

All the logic is found in the first play() method, and that's what we'll be explaining next.

Let say we have a program and would like to play a sound (saved as a wav file) when an event/scenario occurs. The code to do so is very straight forward as illustrated below (a copy and paste from the example above).

        AudioInputStream audioInputStream = null;
        try {
          audioInputStream = AudioSystem
              .getAudioInputStream(The Input Stream);
        } catch (UnsupportedAudioFileException e) {
          e.printStackTrace();
          return;
        } catch (IOException e) {
          e.printStackTrace();
          return;
        }

        SourceDataLine sourceDataLine = null;
        try {
          AudioFormat audioFormat 
              = audioInputStream.getFormat();
          DataLine.Info info = new DataLine.Info(
              SourceDataLine.class, audioFormat);
          sourceDataLine = 
              (SourceDataLine) AudioSystem.getLine(info);
          sourceDataLine.open(audioFormat);
        } catch (LineUnavailableException e) {
          e.printStackTrace();
          return;
        }

        sourceDataLine.start();
        byte[] data = new byte[524288];// 128Kb
        try {
          int bytesRead = 0;
          while (bytesRead != -1) {
            bytesRead = 
                audioInputStream.read(data, 0, data.length);
            if (bytesRead >= 0)
              sourceDataLine.write(data, 0, bytesRead);
          }
        } catch (IOException e) {
          e.printStackTrace();
          return;
        } finally {
          sourceDataLine.drain();
          sourceDataLine.close();
        }

The above code fragment is made from three parts:

  • Initialisation of the audio input stream
  • Initialisation of the audio output
  • Playing the audio data

We're reading bytes from the input stream (the famous wav) and instead of writing/printing these in the console (as we traditionally do with text files), we're writing to the speaker/sound card of the computer.

We start by initialising the It's good to point out that the AudioInputStream, which inherits from the InputStream. This instance behaves the same like any other stream and can be treated/handled in the same manner as other streams.

AudioInputStream audioInputStream = null;
try {
  audioInputStream = AudioSystem
    .getAudioInputStream(The Input Stream);
} catch (UnsupportedAudioFileException e) {
  e.printStackTrace();
  return;
} catch (IOException e) {
  e.printStackTrace();
  return;
}

Then we initialise the audio output (this is NOT an OutputStream), that is, where the sound will be played. This has to match the audio input initialise in the previous step. Remember that there are many different sound files and not all these can be played with the following code.

SourceDataLine sourceDataLine = null;
try {
  AudioFormat audioFormat 
    = audioInputStream.getFormat();
  DataLine.Info info = new DataLine.Info(
    SourceDataLine.class, audioFormat);
  sourceDataLine = 
    (SourceDataLine) AudioSystem.getLine(info);
  sourceDataLine.open(audioFormat);
} catch (LineUnavailableException e) {
  e.printStackTrace();
  return;
}

The first two were quite straight forward. In the third step we're actually playing the sound by reading the bytes and play them in a similar fashion we do with other streams. We're reading a predefined amount of data (128k) into the array called data and saving the amount of bytes read in the other variable bytesRead.

bytesRead = audioInputStream.read(data, 0, data.length);

When the whole file is played, and there is no more data to be played, the read() method returns -1 (like it does with any other InputStream). This will have the while condition to false ending the playing process.

It is good to note that the third step will consume the focus of program until the wav file is played. That is, if you have a two minute wav file, than the above code will take two minutes to execute. All the other parts of the program (that are executed by this thread) will have to wait for the sound/music to finish. Since this is not what we want, the static method play() wraps this code into a thread which is started at the end of the method.

public static void play(final InputStream inputStream) {
  new Thread() {
    @Override
    public void run() {
      Code removed for brevity
    }
  }.start();
}

Since the code is started within a thread the control is immediately returned to the calling method which can proceed without having to wait for the file to play.

To play a wav file, all we need to do is invoke the pay method with the wav file as a parameter as illustrated below.

package com.albertattard.pmm;

public class TheMain {

  public static void main(String[] args) {
    // File downloaded from: 
    //   http://freewavesamples.com/bowed-bass-c2
    TheMusicPlayer.play(TheMain.class
        .getResourceAsStream("Bowed-Bass-C2.wav"));
  }
}

It's good to point out that the wav file Bowed-Bass-C2.wav (available at: http://freewavesamples.com/bowed-bass-c2) is in the same directory/package as the above class.

Wednesday, 16 December 2009

Playing with the Mouse

In this article I'll be discussing how we can you can enhance an graphical component by handling mouse events such as mouse clicks and movements.

This article will not discuss the graphical aspect and assumes that you know how to create a simple UI component extending the JComponent and adding this component into a JFrame. For more information about how to do this, please read the article: Practical Example of Simple Java UI Component.

A note of caution to the reader: This is not an exhaustive article about events and some topics are simple mentioned while others not discussed at all. While you're encouraged to learn as much as you can, it's best to first read this topic as provided here in the order provided and then expand your knowledge once you have read it.

Create an Environment

Let's start by create a simple components (that does nothing) which will add into a frame.

package com.albertattard.pwtm;

import java.awt.Graphics;
import javax.swing.JComponent;

@SuppressWarnings("serial")
public class MyComponent extends JComponent {
  @Override
  protected void paintComponent(Graphics g) {
    super.paintComponent(g);
  }
}

Always start with a super simple class and then slowly evolve it testing each change on the way. Don't wait for bulk changes to test as then it may be too late to understand what's wrong.

Now it's time to create the frame and add the above component to it.

package com.albertattard.pwtm;

import java.awt.Color;
import javax.swing.BorderFactory;
import javax.swing.JFrame;

@SuppressWarnings("serial")
public class MyFrame extends JFrame {

  private MyComponent myComp;

  public MyFrame() {
    initComponents();
  }

  private void initComponents() {
    setLayout(null);

    myComp = new MyComponent();
    myComp.setBorder(
      BorderFactory.createLineBorder(Color.RED));
    myComp.setBounds(10, 10, 400, 200);
    add(myComp);
  }
}

Now let's kick off this example by creating another with the main method and have this show rolling

package com.albertattard.pwtm;

import javax.swing.JFrame;
import javax.swing.SwingUtilities;

public class MyMain {
  public static void main(String[] args) {
    SwingUtilities.invokeLater(new Runnable() {
      public void run() {
        createShowFrame();
      }
    });
  }

  private static void createShowFrame() {
    JFrame frame = new MyFrame();
    frame.setTitle("Playing with the Mouse");
    frame.setSize(600, 400);
    frame.setDefaultCloseOperation(
      JFrame.EXIT_ON_CLOSE);
    frame.setLocationRelativeTo(null);
    frame.setVisible(true);
  }
}

Now that we have all the require components in place let's run. The above three classes should produce the following (or something very similar).
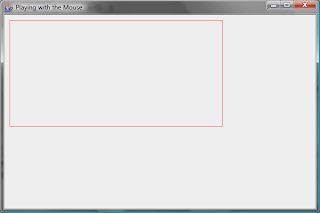

Let's start playing

Java provides three methods/mechanisms that allow us, the developers, to use to handle mouse events. Let say that we want to change the background colour of my component whenever the mouse hovers over it and rest the colour when the mouse moves away from the component.

We want that our component (the class called MyComponent defined above) to do something when the mouse is moved over it. Then, we have to register a mouse listener within this component and act accordingly. The JComponent class (which MyComponent inherits from) has all the logic we need, that is, methods that allow us to register mouse listeners. Whenever mouse events are occur, these methods will advise/notify our listeners with the changes and we can act accordingly. We first start by registering a mouse listener and then implement the methods we're interested in as illustrated below.

package com.albertattard.pwtm;

import java.awt.Color;
import java.awt.Graphics;
import java.awt.event.MouseAdapter;
import java.awt.event.MouseEvent;

import javax.swing.JComponent;

@SuppressWarnings("serial")
public class MyComponent extends JComponent {

  public MyComponent() {
    initListeners();
  }

  private void initListeners() {
    addMouseListener(new MouseAdapter() {
      public void mouseExited(MouseEvent e) {
        setBackground(Color.WHITE);
        repaint();
      }

      public void mouseEntered(MouseEvent e) {
        setBackground(Color.RED);
        repaint();
      }
    });
  }

  @Override
  protected void paintComponent(Graphics g) {
    super.paintComponent(g);

    g.setColor(getBackground());
    g.fillRect(0, 0, getWidth(), getHeight());
  }
}

Hold your horses, I'm lost.

There's lot of new code in this class, so let's start understanding this bit by bit. Let's start with the initListeners() method. This method is registering a mouse listener by calling the addMouseListener () method inherited from the JComponent class and pass our listener. For simplicity, some code was removed.

  private void initListeners() {
    addMouseListener(/* The Mouse Listener*/);
  }

After removing all the other code, this method becomes very simple and understandable. If you refer to the previous example, we also included a constructor which is calling this method, which I don't believe it requires explanation. The paintComponent () method was also enhanced which now fills a rectangle with the set colour. This rectangle has the same size of our component which makes it appear as the background colour.

Let's now turn our attention to the MouseListener. What is it? Whenever a mouse event is fired, (in laymen terms) the JVM advise our listener about the change. It does so by execute one of the five methods defined by the MouseListener listed below:

  • mouseClicked()
  • mouseEntered()
  • mouseExited()
  • mousePressed()
  • mouseReleased()

The method names are self explanatory but the process may not be. We first create an instance of the MouseListener, which is an interface, and override these methods. Then we register our listener with the component. When the mouse is clicked on our component, the method mouseClicked() will be executed. When the mouse hovers on our component, the method mouseEntered() is executed and when the mouse moves away from our component, the mouseExited().

One last thing before we return to our example. How many from the mouse listener's methods do we need to use to fulfil our requirement? Only two, as the requirement is to change the background when the mouse hovers in and out of our component. Java provides what are referred to adaptors. WTF? Java provides a skeleton class that implement this interfaces and provide default methods (methods that do nothing) for all the interface methods. We can then extend this class and override the method we want. Since the adaptor overrides all the interface methods, we only have to override those we're interested in, which simplifies our work.

Back to our initListeners() method. We're creating an instance of MouseAdapter, and registering it with our component.

  private void initListeners() {
    addMouseListener(new MouseAdapter() {
      public void mouseExited(MouseEvent e) {
        setBackground(Color.WHITE);
        repaint();
      }

      public void mouseEntered(MouseEvent e) {
        setBackground(Color.RED);
        repaint();
      }
    });
  }

As you can see from the above code fragment, we're only overriding two methods, the mouseEntered() and mouseExited() methods. In these methods we're changing the background colour and calling the repaint method.

Straight forward he

Getting it to the next level

That was fun, but let's improve it. Let's draw (fill) a circle following the mouse motion.

Before we can do so, we have to discuss another thing, the MouseEvent.

Before the event is fired and our listeners' methods invoked, information about the event is gathered (by something else which you don't need to care about, at least for now) and forwarded to you (the developer) as an event object, the MouseEvent in this case. This object contains information pertaining to our event, such as the mouse position, the time of the event and other things which may be useful when processing such event. We can (need to) use such information to achieve our goal as shown below.

package com.albertattard.pwtm;

import java.awt.Color;
import java.awt.Graphics;
import java.awt.Point;
import java.awt.event.MouseAdapter;
import java.awt.event.MouseEvent;
import java.awt.event.MouseMotionAdapter;
import javax.swing.JComponent;

@SuppressWarnings("serial")
public class MyComponent extends JComponent {

  private Point mousePoint; 

  public MyComponent() {
    setForeground(Color.BLUE); 
    initListeners();
  }

  private void initListeners() {
    addMouseListener(new MouseAdapter() {
      public void mouseExited(MouseEvent e) {
        setBackground(Color.WHITE);
        repaint();
      }

      public void mouseEntered(MouseEvent e) {
        setBackground(Color.RED);
        repaint();
      }
    });

    addMouseMotionListener(new MouseMotionAdapter() {
      @Override
      public void mouseMoved(MouseEvent e) {
        mousePoint = e.getPoint();
        repaint();
      }
    });
  }

  @Override
  protected void paintComponent(Graphics g) {
    super.paintComponent(g);

    g.setColor(getBackground());
    g.fillRect(0, 0, getWidth(), getHeight());

    if (mousePoint != null) {
      int ballSize = 15;
      g.setColor(getForeground());
      g.fillOval(mousePoint.x - ballSize / 2, 
                 mousePoint.y - ballSize / 2,
                 ballSize, ballSize);
    }
  }
}

The changes from the previous class are highlighted and discussed below.

An instance field was added to our component. Why? We need to transfer the mouse position, magically provided to us by the mouse events (discussed later on), to the paint method. Since we cannot call the paint method directly from the event (the reapint() call is something else), we need to save this information in the instance field, mousePoint, and the use it from the paint method. This instance field is accessible by both methods. First this field is updated by the method

      public void mouseMoved(MouseEvent e) {
        mousePoint = e.getPoint();
        repaint();
      }

within our new adaptor, . The method mouseMoved() is invoked every time the mouse is moved within our component. This is important to understand. Only the mouse events that are related with our component are captured by our listeners. So when the mouse moves out of our component, this method will stop being invoked.

Next we'll discuss the mouse clicks

Handling the clicks

Let say that we also want to handle the mouse click that happen on our component. For simplicity we'll display a simple text in the top left corner listing the number of click that occure as shown below.

A long story short, add a new instance field (called clickCount) of type int and paint its value in the paint method as highlighted below. Also, override the appropriate method in the mouse adaptor.

package com.albertattard.pwtm;

import java.awt.Color;
import java.awt.Graphics;
import java.awt.Point;
import java.awt.event.MouseAdapter;
import java.awt.event.MouseEvent;
import java.awt.event.MouseMotionAdapter;

import javax.swing.JComponent;

@SuppressWarnings("serial")
public class MyComponent extends JComponent {

  private Point mousePoint;
  private int clickCount; 

  public MyComponent() {
    setForeground(Color.BLUE);
    initListeners();
  }

  private void initListeners() {
    addMouseListener(new MouseAdapter() {
      public void mouseExited(MouseEvent e) {
        setBackground(Color.WHITE);
        repaint();
      }

      public void mouseEntered(MouseEvent e) {
        setBackground(Color.RED);
        repaint();
      }

      @Override
      public void mouseClicked(MouseEvent e) {
        clickCount++;
        repaint();
      }
    });

    addMouseMotionListener(new MouseMotionAdapter() {
      @Override
      public void mouseMoved(MouseEvent e) {
        mousePoint = e.getPoint();
        repaint();
      }
    });
  }

  @Override
  protected void paintComponent(Graphics g) {
    super.paintComponent(g);

    g.setColor(getBackground());
    g.fillRect(0, 0, getWidth(), getHeight());

    if (mousePoint != null) {
      int ballSize = 15;
      g.setColor(getForeground());
      g.fillOval(mousePoint.x - ballSize / 2,
          mousePoint.y - ballSize / 2, ballSize, ballSize);
    }

    if (clickCount > 0) {
      g.setColor(getForeground());
      g.drawString("Click Count: " + clickCount, 10, 20);
    } else {
      g.setColor(getForeground());
      g.drawString("No Clicks!!!", 10, 20);
    }
  }
}

The above code is not rocket science but it has a little flaw. If you drag the mouse inside the component, the blue circle will not follow the mouse pointer as illustrated below.

Why not? The MouseMotionListener, which the MouseMotionAdapter implements has two methods but we're only overriding one as illustrated below.

    addMouseMotionListener(new MouseMotionAdapter() {
      @Override
      public void mouseMoved(MouseEvent e) {
        mousePoint = e.getPoint();
        repaint();
      }
    });

The other method, mouseDragged(), is used to handle mouse dragging events as illustrated code fragment below.

     addMouseMotionListener(new MouseMotionAdapter() {
      @Override
      public void mouseDragged(MouseEvent e) {
        mousePoint = e.getPoint();
        repaint();
      }
      
      @Override
      public void mouseMoved(MouseEvent e) {
        mousePoint = e.getPoint();
        repaint();
      }
    }); 

Dragging is more complex than one may think and is discussed further in the following section

Dragging the mouse

For this example, we'll create a new component and will make use of it rather than keep changing the other one. Like before, we'll start with a simple example and keep building on it. We'll start with the following simple component.

package com.albertattard.pwtm;

import java.awt.Color;
import java.awt.Graphics;
import java.awt.Graphics2D;
import java.awt.Rectangle;
import javax.swing.JComponent;

@SuppressWarnings("serial")
public class MyDragComponent extends JComponent {

  private Rectangle draggableShape;

  public MyDragComponent() {
    draggableShape = new Rectangle(20, 20, 50, 50);
    setForeground(Color.BLUE);
  }

  @Override
  protected void paintComponent(Graphics g) {
    super.paintComponent(g);

    Graphics2D g2d = (Graphics2D) g;

    g2d.setColor(getBackground());
    g2d.fillRect(0, 0, getWidth(), getHeight());

    g2d.setColor(getForeground());
    g2d.fill(draggableShape);
  }
}

This component simply draws a solid blue 50 by 50 rectangle at the x and y coordinates 20 as illustrated below

Remember to add this component to the frame before you test it out

Let's start be arm our rectangle with a red border when the mouse enters the box as shown below. Note that the component has a red border and the mouse events are triggered for any mouse activity within the component. We need to filter out movements outside the rectangle and only arm the rectangle when the mouse is on it.

How can we do that? Quiet simple. Like before, we create a field (called mouseInside) and will set it to true when the mouse is within the rectangle and false otherwise. The updates are highlighted below.

package com.albertattard.pwtm;

import java.awt.BasicStroke;
import java.awt.Color;
import java.awt.Graphics;
import java.awt.Graphics2D;
import java.awt.Rectangle;
import java.awt.event.MouseEvent;
import java.awt.event.MouseMotionAdapter;

import javax.swing.JComponent;

@SuppressWarnings("serial")
public class MyDragComponent extends JComponent {

  private Rectangle draggableShape;
  private boolean mouseInside; 

  public MyDragComponent() {
    draggableShape = new Rectangle(20, 20, 50, 50);
    setForeground(Color.BLUE);
    initListeners();
  }

  private void initListeners() {
    addMouseMotionListener(new MouseMotionAdapter() {
      @Override
      public void mouseMoved(MouseEvent e) {
        mouseInside = draggableShape.contains(e.getPoint());
        repaint();
      }
    });
  }

  @Override
  protected void paintComponent(Graphics g) {
    super.paintComponent(g);

    Graphics2D g2d = (Graphics2D) g;

    g2d.setColor(getBackground());
    g2d.fillRect(0, 0, getWidth(), getHeight());

    g2d.setColor(getForeground());
    g2d.fill(draggableShape);

    if (mouseInside) {
      g2d.setColor(Color.RED);
      g2d.setStroke(new BasicStroke(3));
      g2d.draw(draggableShape);
      g2d.setStroke(new BasicStroke(1));
    }
  }
}
Why are we resetting the stroke at the end of the paint component method? Ideally you rest all changes made to the graphics component once done as other paint methods for this object such paint border method will inherit your changes. In this case, if you do not reset the stroke the border will be painted with this stroke.

The following code fragment does the trick. The method mouseMoved () is continually called by the underlying system (so to say) every time the mouse is moved over our component. When the mouse point (retrieved from the mouse event provided as the method parameter) is within the rectangle area, the mouseInside field is set to true.

      public void mouseMoved(MouseEvent e) {
        mouseInside = draggableShape.contains(e.getPoint());
        repaint();
      }

Let's not stop here. Let's make the rectangle draggable. By draggable I mean that the user can drag the rectangle around our component as shown below.

This is not an easy task and some may find it hard to understand but let's not panic. The following code does the job.

package com.albertattard.pwtm;

import java.awt.BasicStroke;
import java.awt.Color;
import java.awt.Graphics;
import java.awt.Graphics2D;
import java.awt.Point;
import java.awt.Rectangle;
import java.awt.event.MouseEvent;
import java.awt.event.MouseMotionAdapter;
import javax.swing.JComponent;

@SuppressWarnings("serial")
public class MyDragComponent extends JComponent {

  private Rectangle draggableShape;
  private boolean mouseInside;
  private Point lastMousePoint; 

  public MyDragComponent() {
    draggableShape = new Rectangle(20, 20, 50, 50);
    setForeground(Color.BLUE);
    initListeners();
  }

  private void initListeners() {
    addMouseMotionListener(new MouseMotionAdapter() {
      @Override
      public void mouseMoved(MouseEvent e) {
        mouseInside = draggableShape.contains(e.getPoint());
        lastMousePoint = e.getPoint();
        repaint();
      }

      @Override
      public void mouseDragged(MouseEvent e) {
        mouseInside = draggableShape.contains(e.getPoint());
        if (mouseInside) {
          if (lastMousePoint != null) {
            draggableShape.x += 
                e.getPoint().x - lastMousePoint.x;
            draggableShape.y += 
                e.getPoint().y - lastMousePoint.y;
          }
        }
        lastMousePoint = e.getPoint();
        repaint();
      }
    });
  }

  @Override
  protected void paintComponent(Graphics g) {
    super.paintComponent(g);

    Graphics2D g2d = (Graphics2D) g;

    g2d.setColor(getBackground());
    g2d.fillRect(0, 0, getWidth(), getHeight());

    g2d.setColor(getForeground());
    g2d.fill(draggableShape);

    if (mouseInside) {
      g2d.setColor(Color.RED);
      g2d.setStroke(new BasicStroke(3));
      g2d.draw(draggableShape);
      g2d.setStroke(new BasicStroke(1));
    }
  }
}

Let's starts discussing the code.

When the mouse is dragged within the rectangle, we're also moving it. The rectangle can be dragged from anywhere within. So we have to take under consideration where the mouse was clicked within the rectangle and shift the rectangle by the offset, that is, by the amount the mouse was moved. We cannot simply set the rectangle's x and y coordinates to match those of the event. The following sketch highlights this (hopefully).
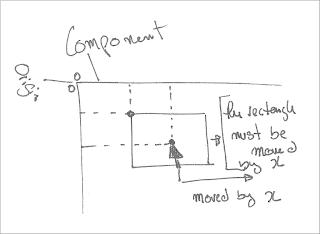
To do this we added a new field called lastMousePoint, which is used to save the last mouse position (as the name infers). Instead of setting the rectangle coordinates equal to the mouse coordinates we adjust them by how much the mouse was moved using the following (copy and paste from above) logic.

      @Override
      public void mouseDragged(MouseEvent e) {
        mouseInside = draggableShape.contains(e.getPoint());
        if (mouseInside) {
          if (lastMousePoint != null) {
            draggableShape.x += 
                e.getPoint().x - lastMousePoint.x;
            draggableShape.y += 
                e.getPoint().y - lastMousePoint.y; 
          }
        }
        lastMousePoint = e.getPoint();
        repaint();
      }

It is important to also update the lastMousePoint field before we exit the above method.

A tip for the champions. If you observe the previous class, you notice that the field lastMousePoint is only used within the adaptor. Ideally we move this field within the adaptor as highlighted below.

 addMouseMotionListener(new MouseMotionAdapter() {
      
      private Point lastMousePoint; 
      
      @Override
      public void mouseMoved(MouseEvent e) {
        mouseInside = draggableShape.contains(e.getPoint());
        lastMousePoint = e.getPoint();
        repaint();
      }

      @Override
      public void mouseDragged(MouseEvent e) {
        mouseInside = draggableShape.contains(e.getPoint());
        if (mouseInside) {
          if (lastMousePoint != null) {
            draggableShape.x += 
                e.getPoint().x - lastMousePoint.x;
            draggableShape.y += 
                e.getPoint().y - lastMousePoint.y;
          }
        }
        lastMousePoint = e.getPoint();
        repaint();
      }
    });

Too keep it simple, the above change will not apply to the rest of the examples

One last thing before we go. Note that we're able to drag the rectangle outside the component printable area. This is not always good and we would like to prevent this as illustrated below.

This is not a difficult change. All we need to do is cap the changes to the rectangle as illustrated in the following code fragment.

      @Override
      public void mouseDragged(MouseEvent e) {
        mouseInside = draggableShape.contains(e.getPoint());
        if (mouseInside) {
          if (lastMousePoint != null) {
            draggableShape.x += 
                e.getPoint().x - lastMousePoint.x;
            draggableShape.y += 
                e.getPoint().y - lastMousePoint.y;

            draggableShape.x = Math.max(draggableShape.x, 0);
            draggableShape.x = Math.min(draggableShape.x,
                getWidth() - draggableShape.width);
            draggableShape.y = Math.max(draggableShape.y, 0);
            draggableShape.y = Math.min(draggableShape.y,
                getHeight() - draggableShape.height);
          }
        }
        lastMousePoint = e.getPoint();
        repaint();
      }

The rest of the class is not listed for brevity.

Tuesday, 10 November 2009

Capturing Tab key in GWT TextArea

A common thing developers have to deal with when using text areas in their web applications is the TAB key. Different from most of the other common web UI components, the text area component may require to capture the TAB key and "display" it as part of the text instead of transferring the focus to the next UI component in line.

This article will discuss how to capture the TAB key and prevent the transfer of focus within the text area. Technically speaking this code should happen within JavaScript, but this article makes use of the Google Web Toolkit (GWT). Here we're not going to discuss the pros and cons of GWT, but one should consider such API when developing JavaScript websites. Please refer to http://code.google.com/webtoolkit/ for more information about GWT.

For those of you who would only like to see the solution, please click here or scroll down to the bottom. For the others who would like to read about it; we'll start with a simple example and will be incrementing on it as we go along.

The Solution

We need to do the following things in order to capture the TAB key within the text area:

  • Listen to key (Key Down) events
  • Filter the TAB key (check if the TAB key is pressed)
  • Prevent the default action and stop event propagation
  • Insert the tab character at the current cursor position
  • Register the listener with the text area

Each of the above points are discussed, first individually and then merged together as one solution.

Key Down Event Handler

There are three types of key events (and handlers which handle the respective event):

  • Key Down
  • Key Up
  • Key Pressed

The first question that comes to mind is, why three? Very simple; there are situations, like ours, where you want to handle the events before they trigger other events (transfer focuse), while in other cases we just want to act after these happened, such as the key pressed event (spellchecker for example). In our case we want to disable the default behaviour from propagating any further and prevent the text area from losing its focus.

GWT provides the com.google.gwt.event.dom.client.KeyDownHandler interface that can be registered with a text area and is invoked by the text area whenever a key is pressed. To be precise, this handler is invoked when the key is down (the first from the three handlers mentioned above). The KeyDownHandler interface has only one method called onKeyDown() that expects one parameter of type: com.google.gwt.event.dom.client.KeyDownEvent. The following code fragment shows how to create a key down handler (Java - GWT).

KeyDownHandler handler = new KeyDownHandler() {
  @Override
  public void onKeyDown(KeyDownEvent event) {
    // Handle key down event here
  }
}
How come you're creating an instance of an interface? As you can see form the above example, Java allows to create new classes that extends or implements other classes and interfaces on-the-fly. These are called, anonymous inner classes. Anonymous, because the new class does not have a name. This is very convenient as you don't have to create a new class, but just implement in within the class you're using it.

We can now register the above handler with the text area as illustrated in the following code fragment

TextArea textArea = new TextArea();
textArea.addKeyDownHandler(handler); 

The numbered list shown above, lists this step as last. It doesn't make a difference when you register the handler, as long as the handler is initialised and not null.

Filter the TAB key

The onKeyDown() method is invoked by the text area every time a key is pressed while it's in focus. The text area will only invoke this method when you're typing in it. With that said, we only need to act when the TAB key is pressed. All the other keys are ignored. To do that, we have to filter the TAB by using the its ASCII decimal value: 9, as highlighted in the following code fragment.

KeyDownHandler handler = new KeyDownHandler() {
  @Override
  public void onKeyDown(KeyDownEvent event) {
    if (event.getNativeKeyCode() == 9) {
      // Handle TAB key down event here
    }
  }
}

The if statement will only yield true when the TAB key is pressed, otherwise false

Prevent the default action and stop event propagation

By default, when the TAB key is presses, the focus is transferred from the UI component that has it to the next com.google.gwt.user.client.ui.Focusable component. We have to prevent the default behaviour by invoking the methods preventDefault() and stopPropagation() on the KeyDownEvent instance provided as a parameter to the onKeyDown() method.

KeyDownHandler handler = new KeyDownHandler() {
  @Override
  public void onKeyDown(KeyDownEvent event) {
    if (event.getNativeKeyCode() == 9) {
      event.preventDefault();
      event.stopPropagation();
    }
  }
}

The above code will capture the TAB key events and will prevent the text area from losing its focus, but unfortunately will not print the TAB key in the text area. We have to programmatically add this key to the text area text as shown in the following section

Insert the tab character at the current cursor position

This should be the least of our problems but one must pay attention. Remember that the user may be editing in the middle of the document so we cannot just append the TAB at the end. We have to insert the TAB just right where the cursor is as highlighted in the following code fragment.

KeyDownHandler handler = new KeyDownHandler() {
  @Override
  public final void onKeyDown(KeyDownEvent event) {
    if (event.getNativeKeyCode() == 9) {
      event.preventDefault();
      event.stopPropagation();
      if(event.getSource() instanceof TextArea) {
        TextArea ta = (TextArea) event.getSource();
        int index = ta.getCursorPos();
        String text = ta.getText();
        ta.setText(text.substring(0, index) 
                   + "\t" + text.substring(index));
        ta.setCursorPos(index + 1);
      }
    }
  }
};

This can be easier said than done for some. So let's start line by line. We're first checking that the source is of type TextArea. We don't have to do this, but it will prevent an exception should someone else use this handler with another UI component that text area. Next, we're casting the source which triggered the event into a TextArea. Then we retrieved the cursor position (as an integer) and all its text in the line following that. Now, we split the text retrieved in two parts: the part before the cursor and the part following the cursor. We create a new string made from, the both parts delimited with the TAB character with is attaching both parts shown below.

ta.setText(text.substring(0, index) 
           + "\t" + text.substring(index));

Finally, we set the cursor location just after the TAB key, that is, one up in respect to the cursor before the key was pressed.

The Example

Complete example

public static final KeyDownHandler DEFAULT_TEXTAREA_TAB_HANDLER = new KeyDownHandler() {
    @Override
    public final void onKeyDown(KeyDownEvent event) {
      if (event.getNativeKeyCode() == 9) {
        event.preventDefault();
        event.stopPropagation();
        final TextArea ta = (TextArea) event.getSource();
        final int index = ta.getCursorPos();
        final String text = ta.getText();
        ta.setText(text.substring(0, index) 
                   + "\t" + text.substring(index));
        ta.setCursorPos(index + 1);
      }
    }
  };

Use

final TextArea textArea = new TextArea();
textArea.addKeyDownHandler(DEFAULT_TEXTAREA_TAB_HANDLER);